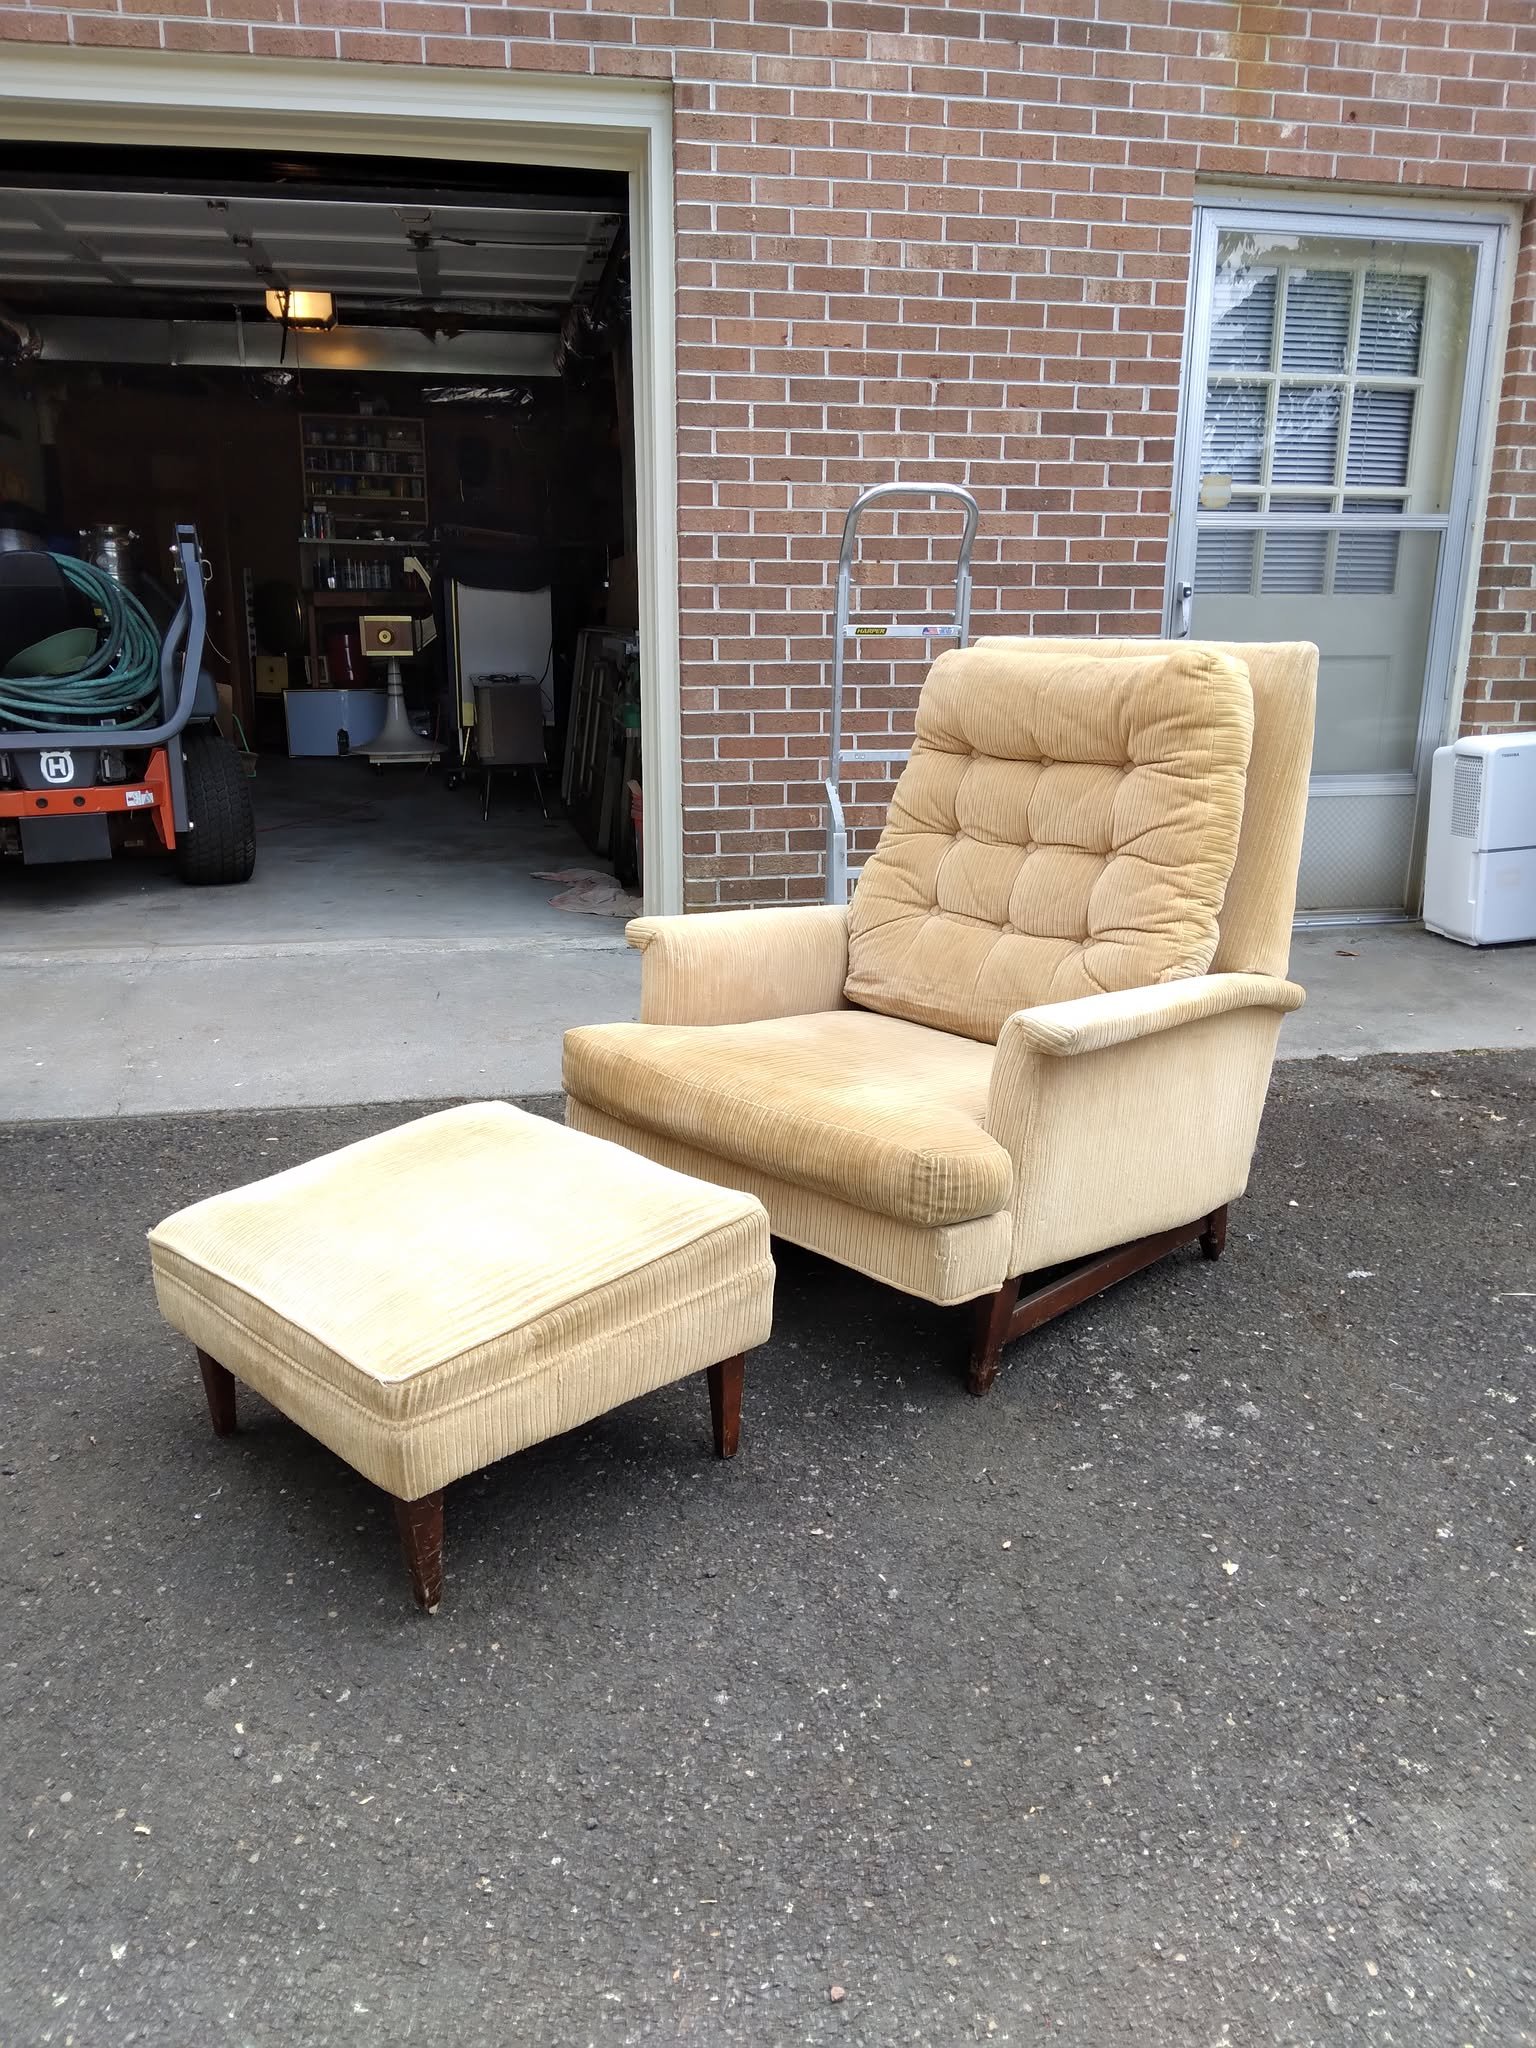
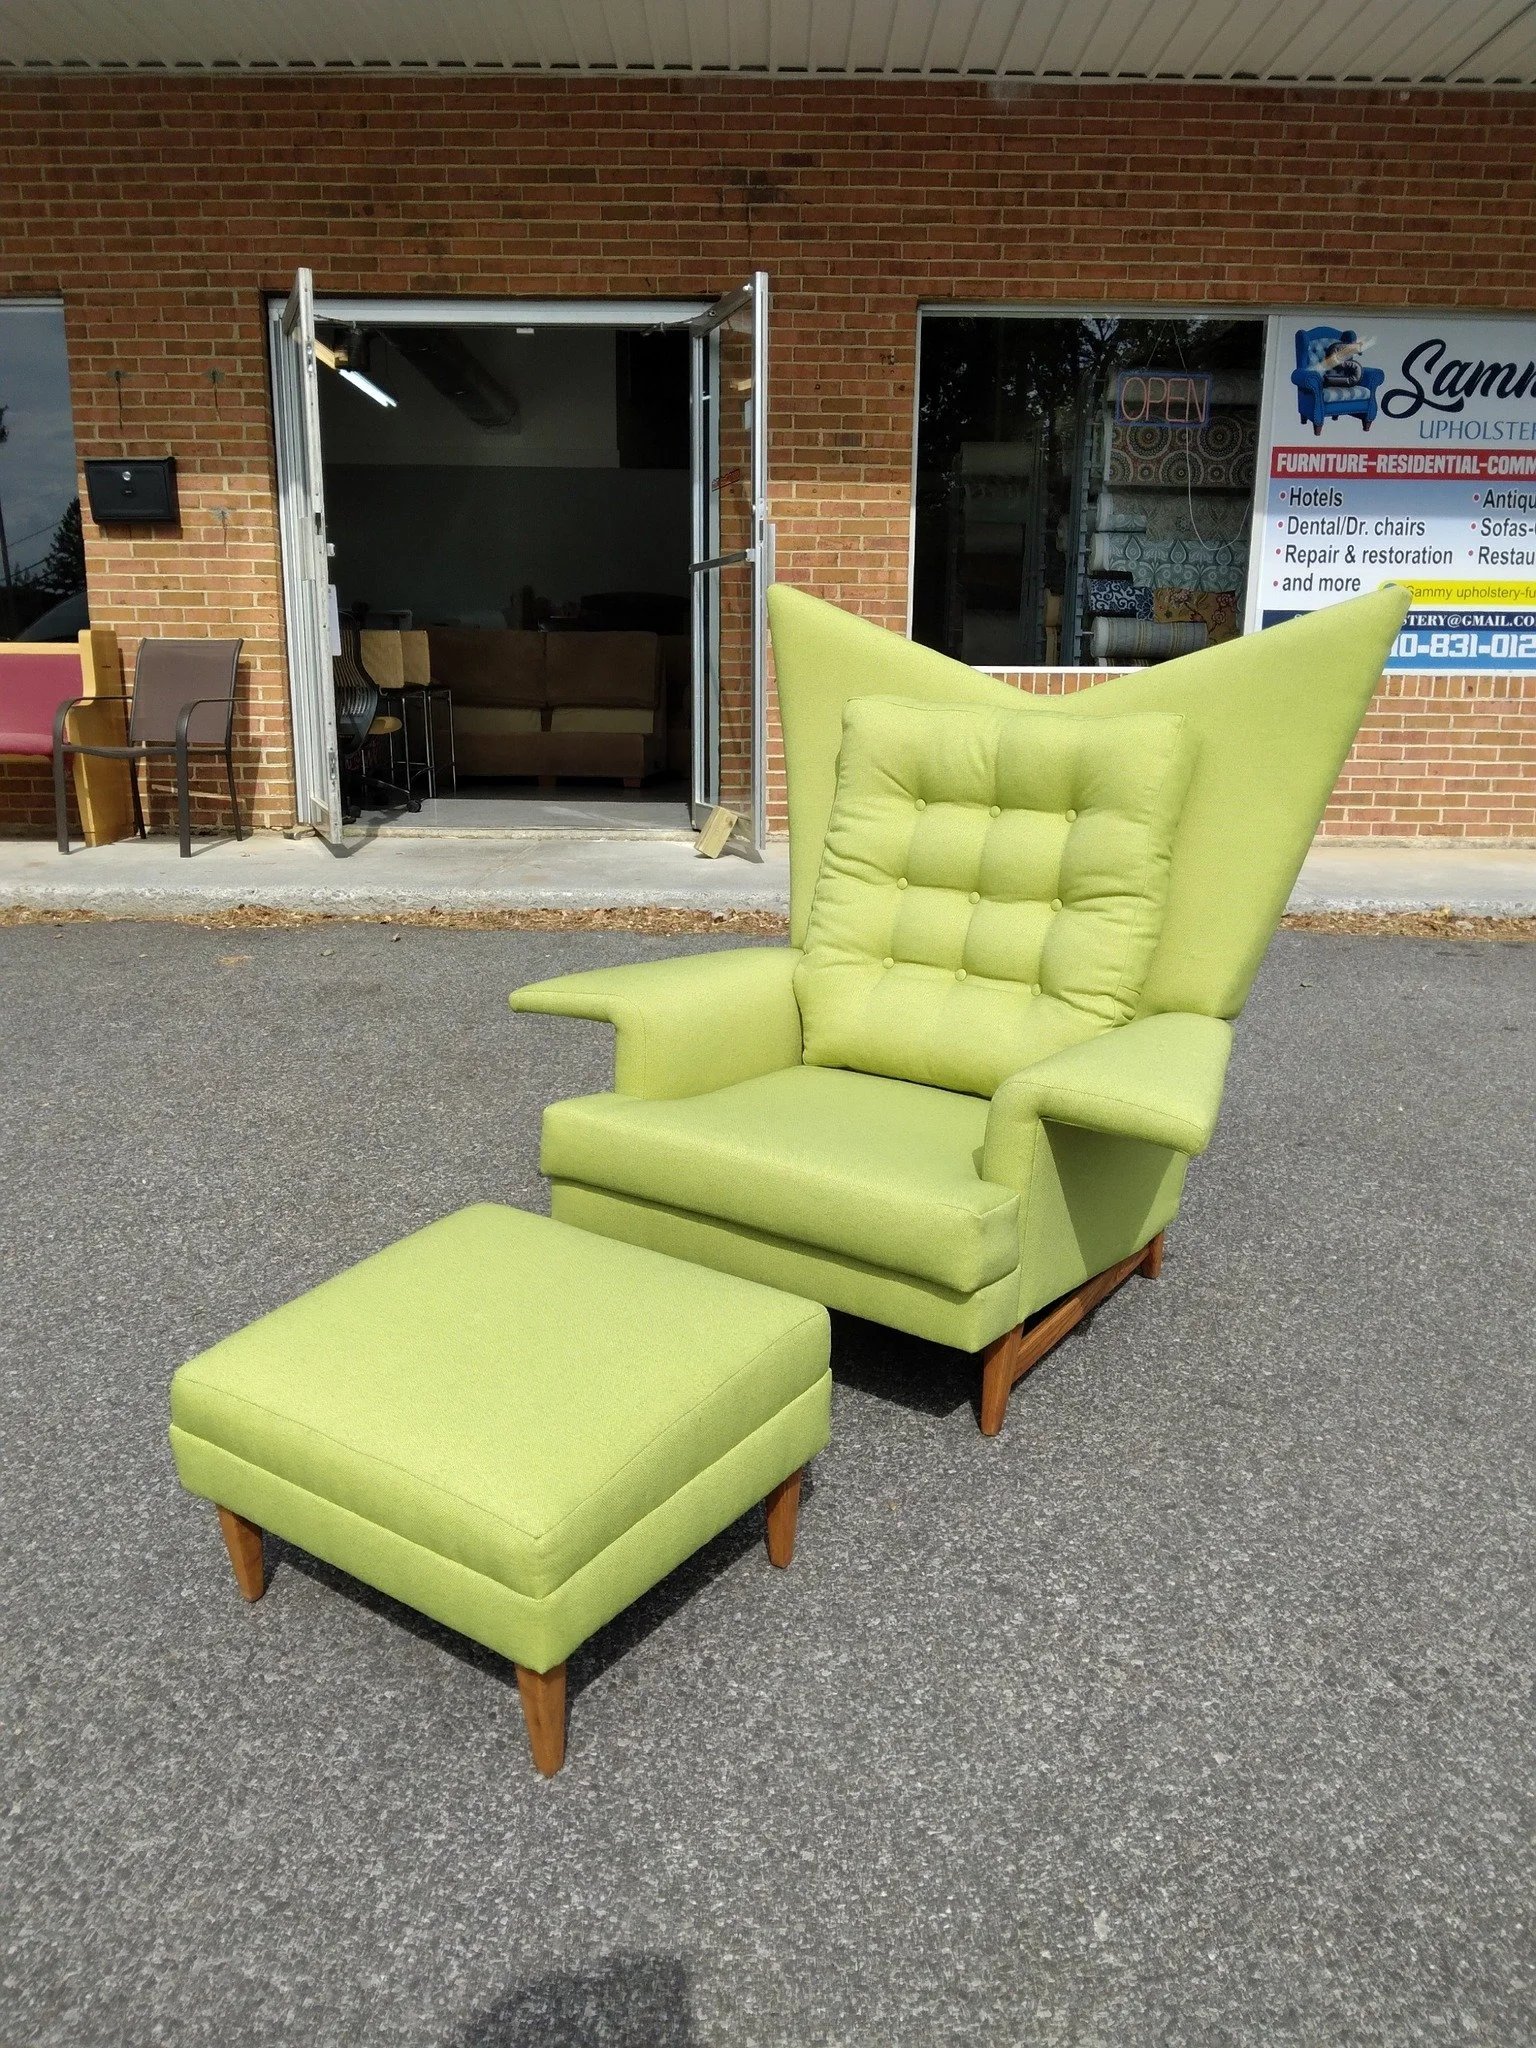
Old Kroehler reclining lounge chair gets a space age boost!
Sometimes it is a shame to alter a vintage piece - but this chair was a bit boring and needed and an atomic upgrade. It cooperated nicely.
Sometimes it is a shame to alter a vintage piece - but this chair was a bit boring and needed and an atomic upgrade. It cooperated nicely.

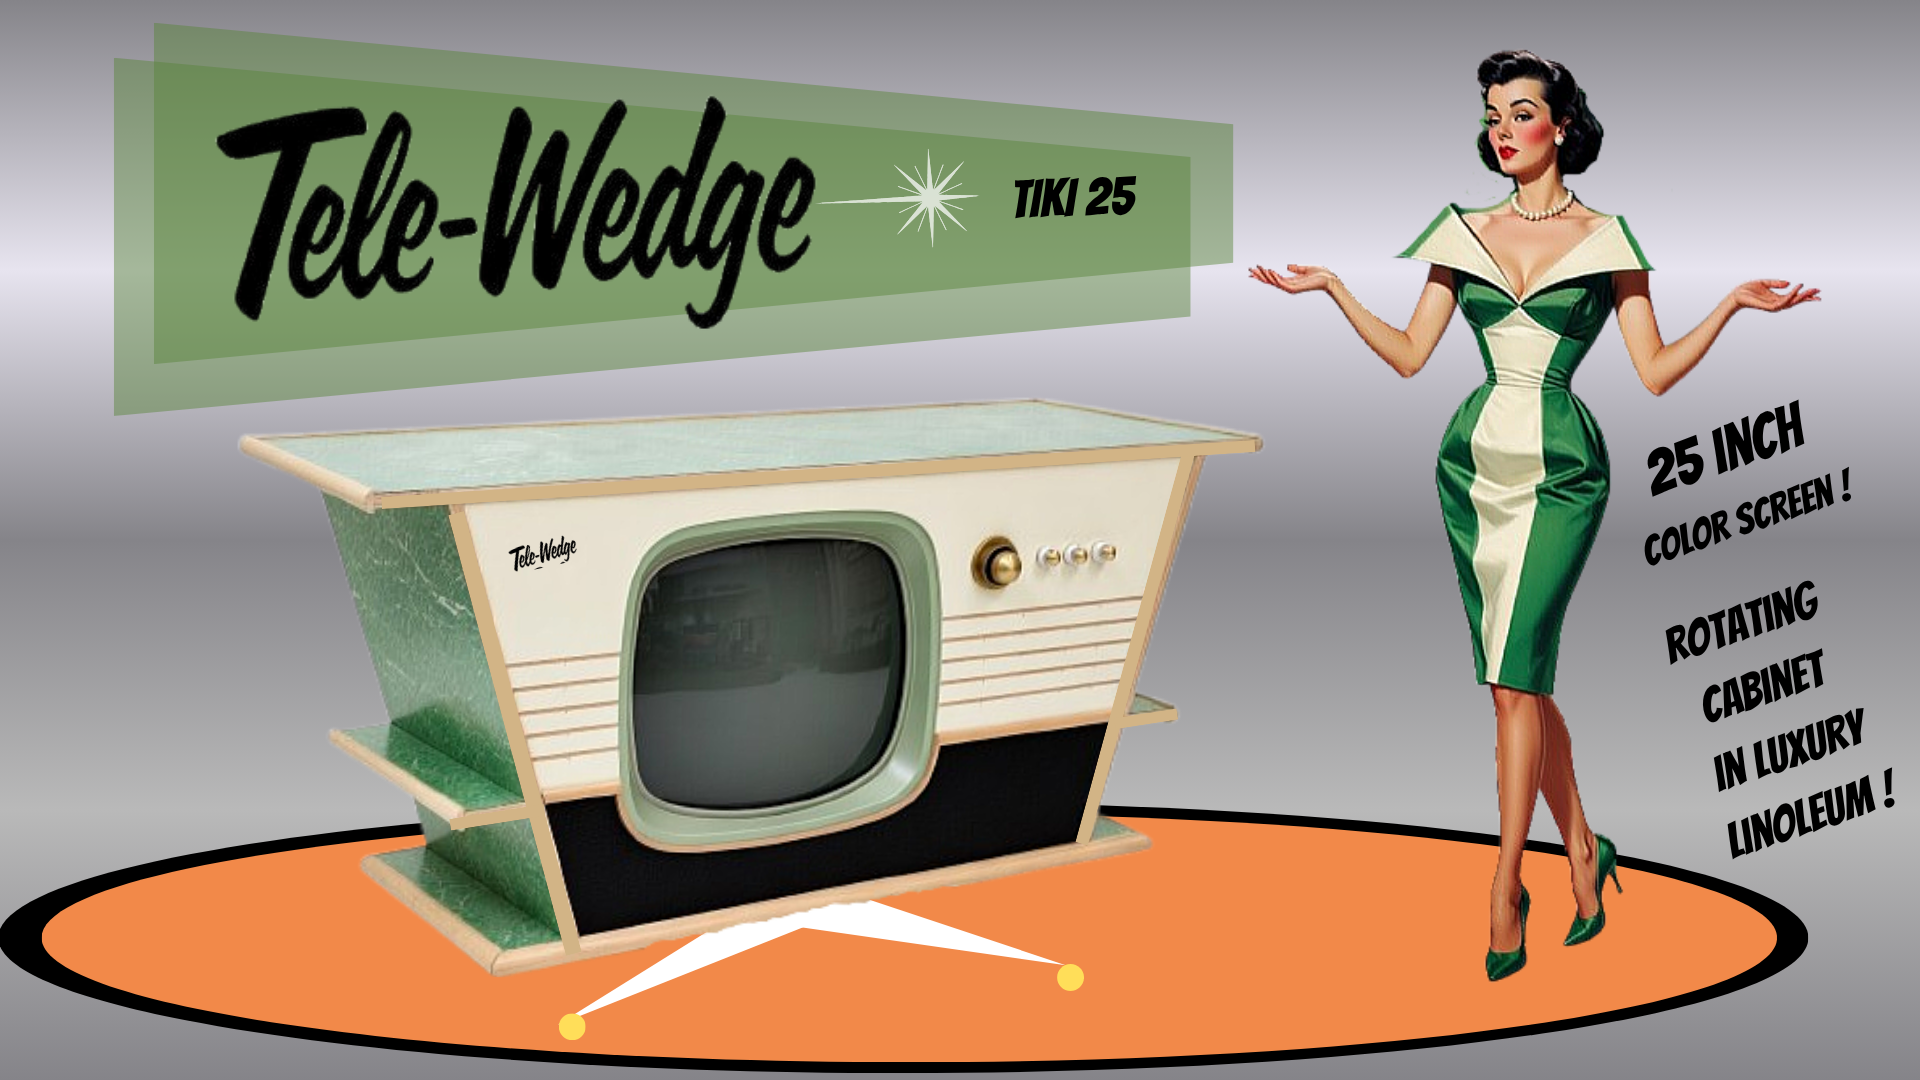
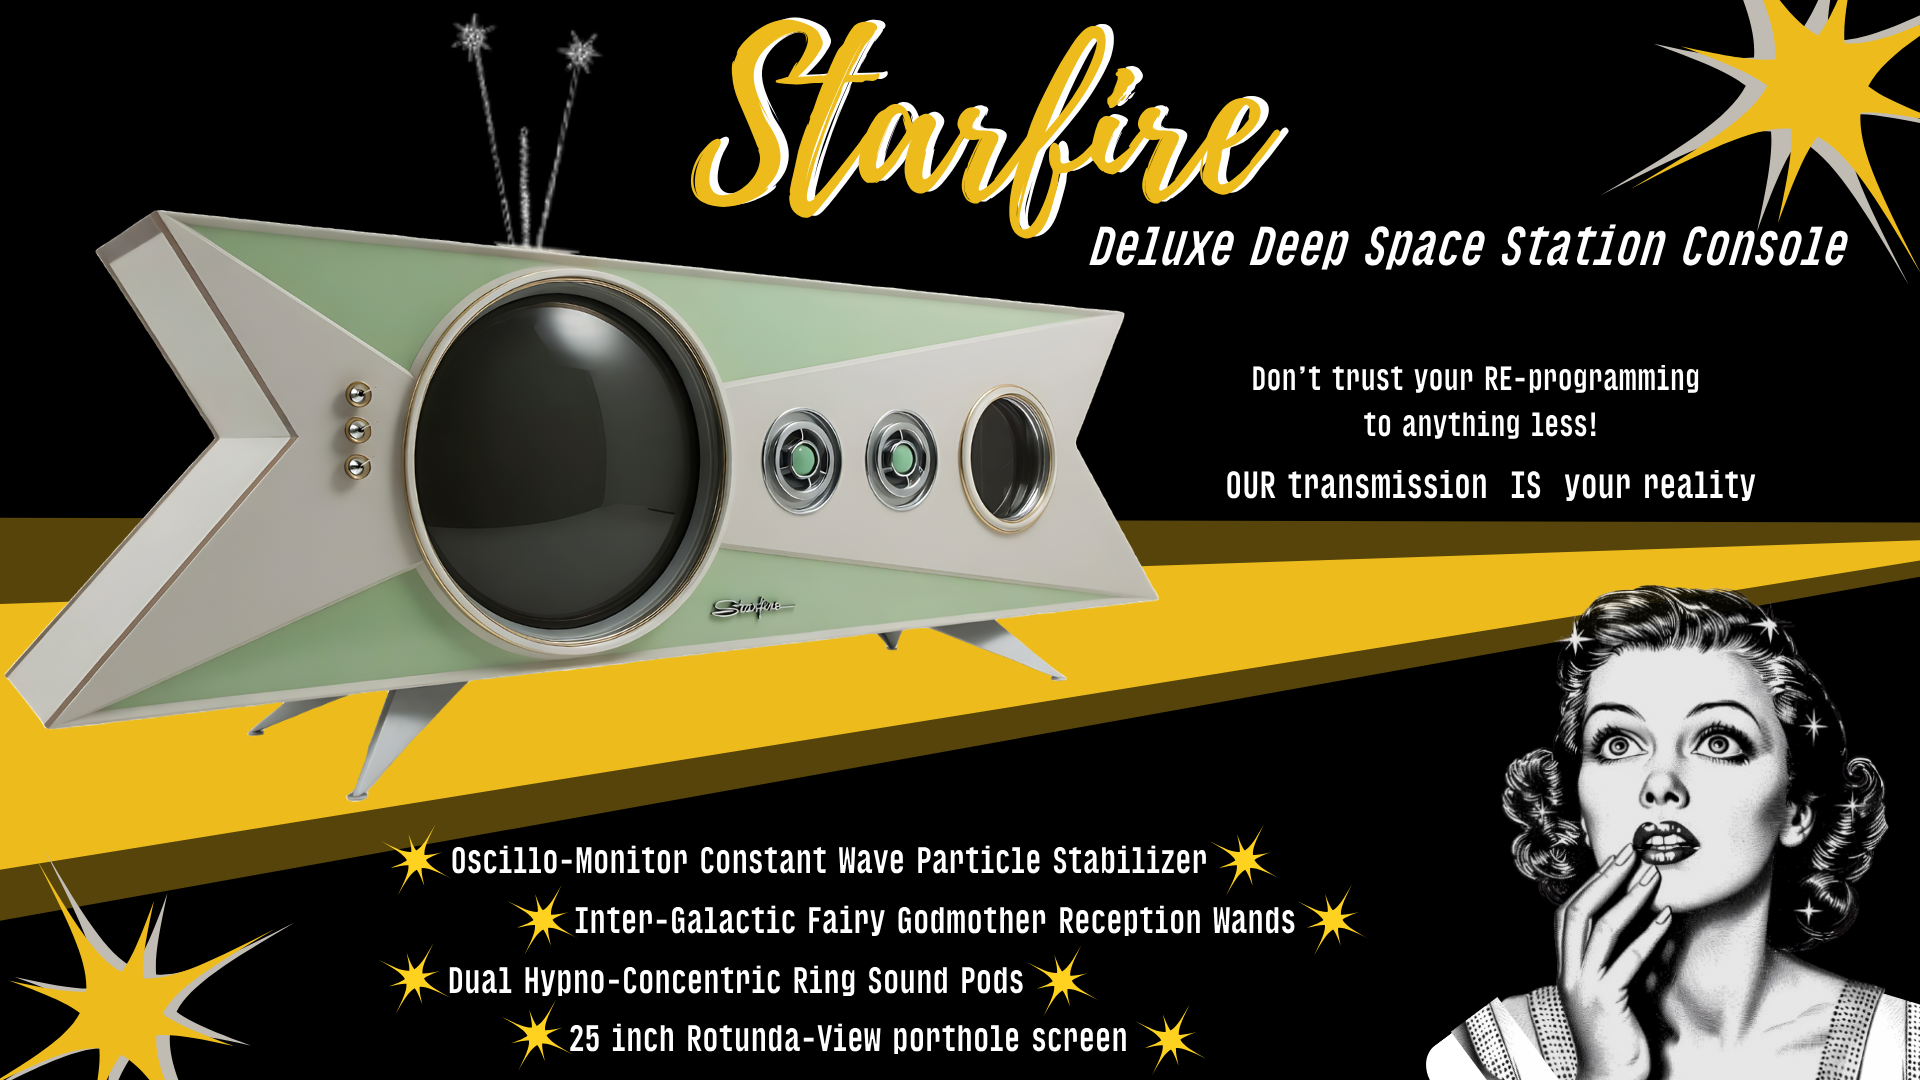
I try to make a retro style ad for the pieces that I build. Here are a bunch . I make these ads in Canva and all of the pieces shown here are actual functioning sculptures that I have built. You can see more pics in the photo gallery.


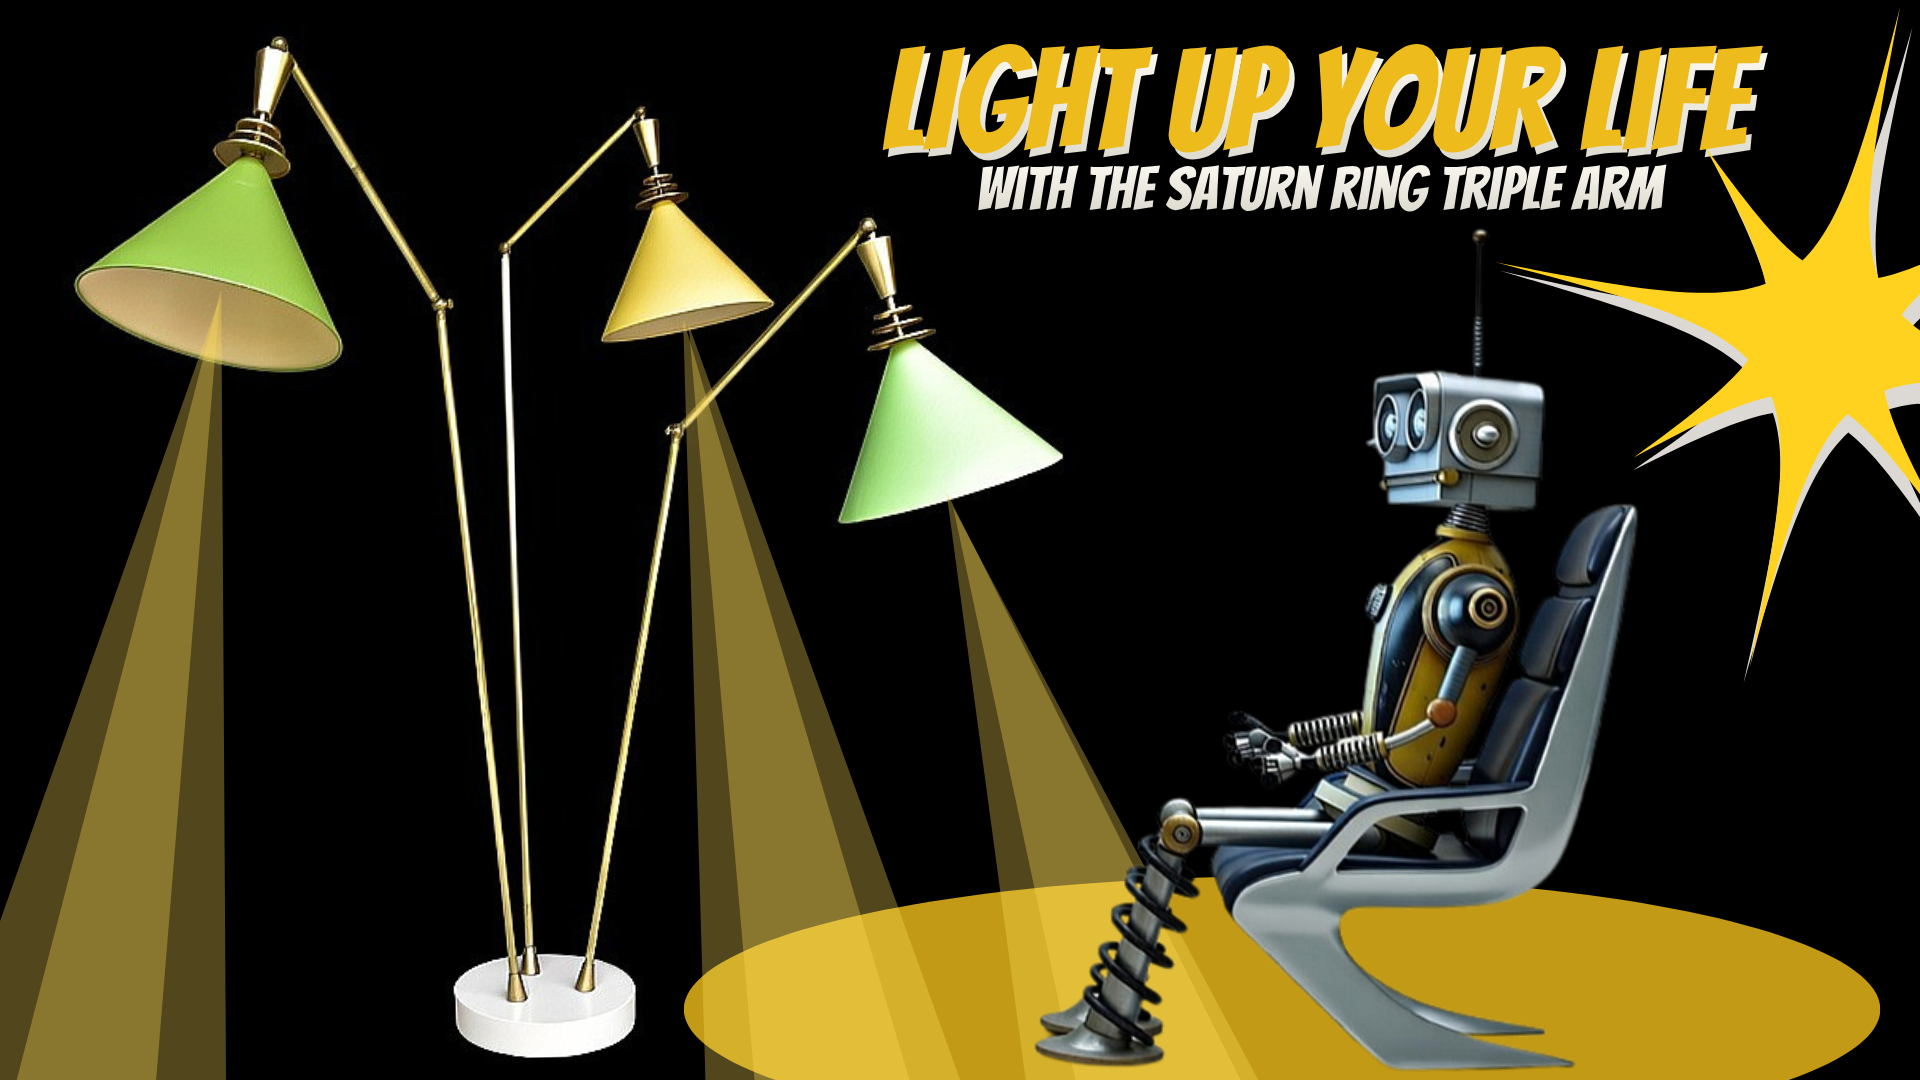
Here are a few of my latest designs and builds. More pics of each on the gallery page.
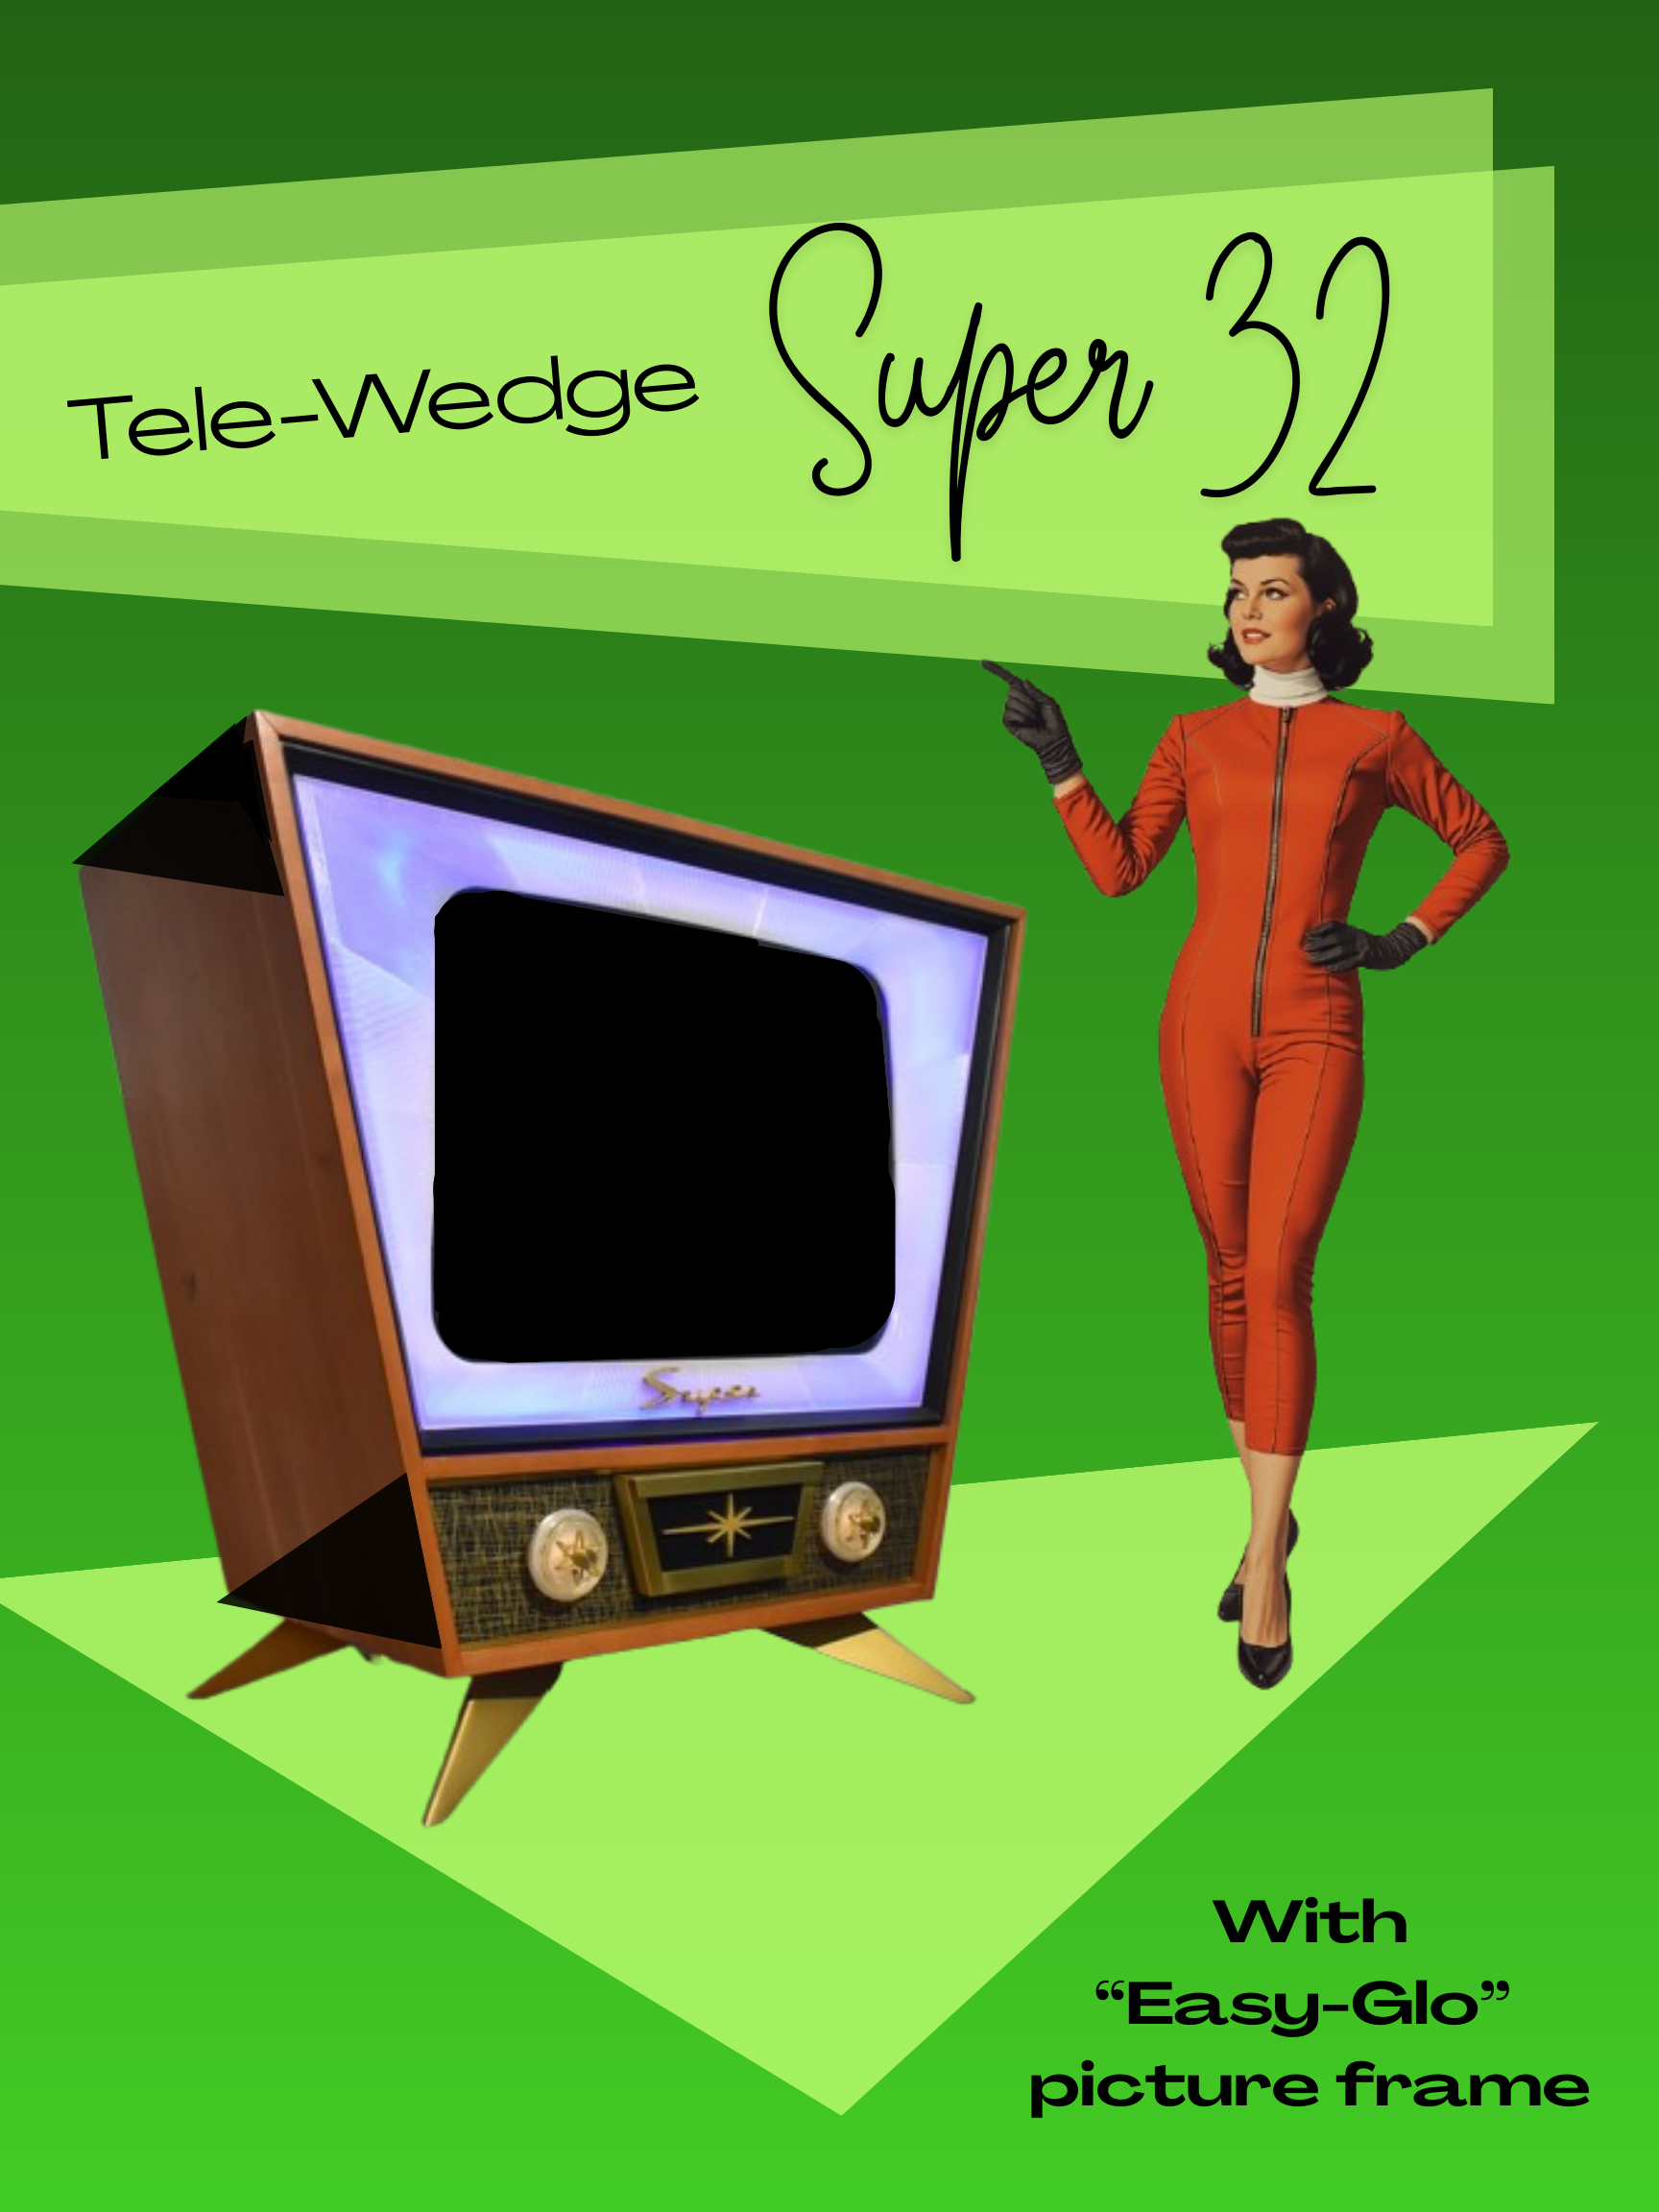
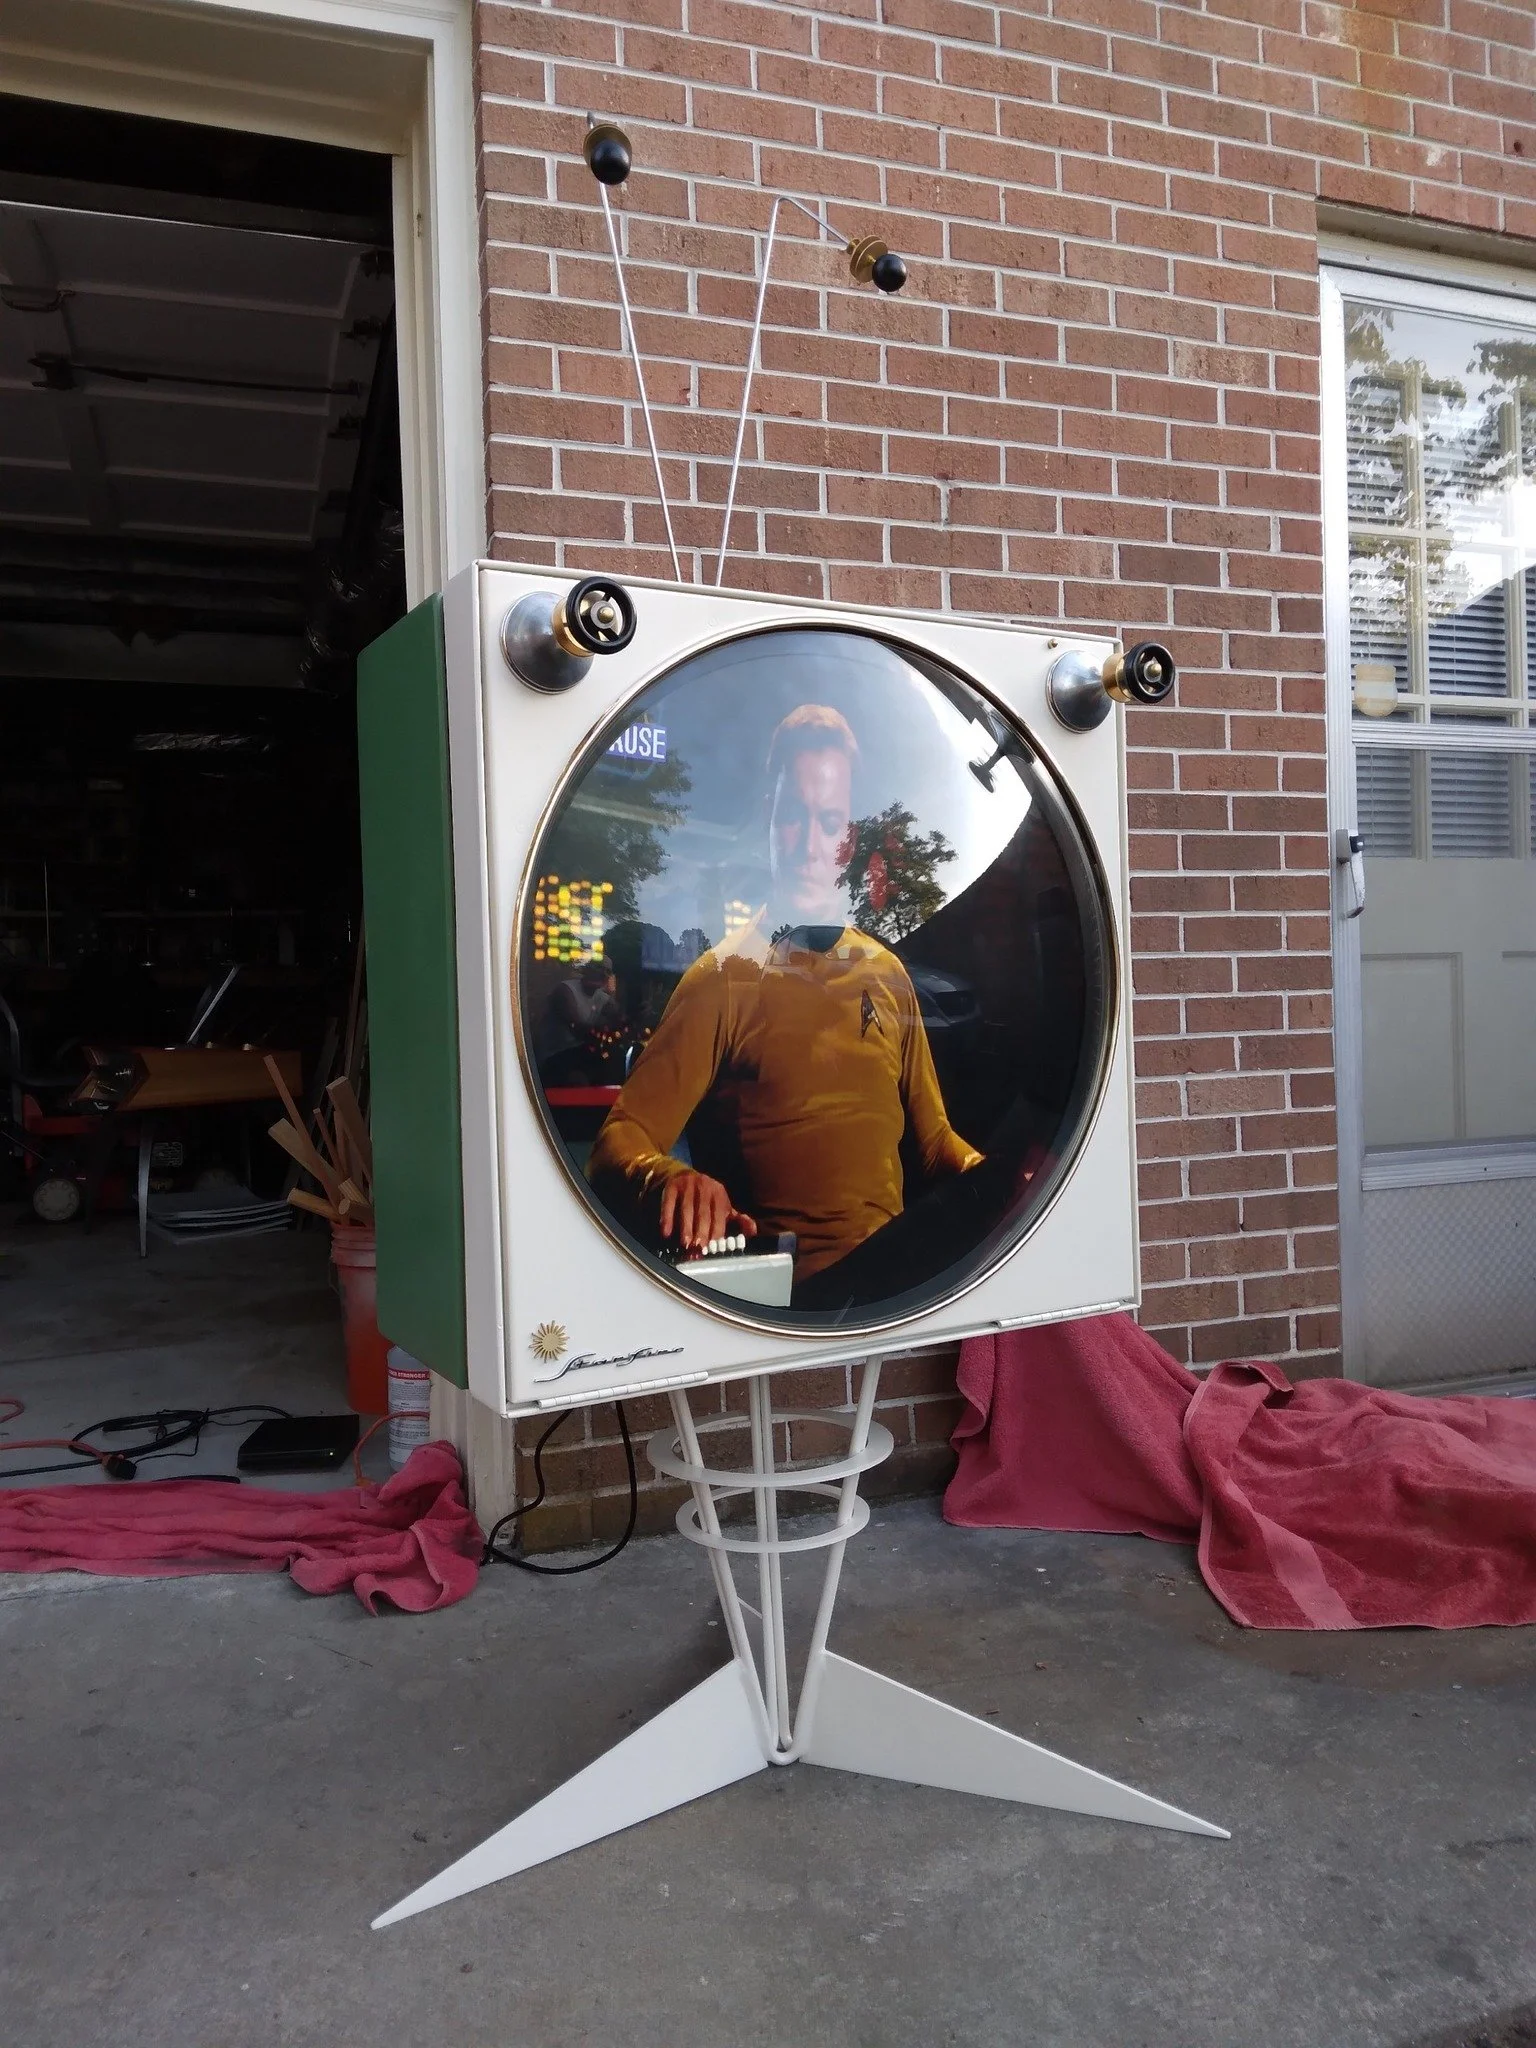
The idea with all of the custom sets I build is that they are retro futurism sculptures. They also happen to function as TVs … but the focus is sculpture and design.
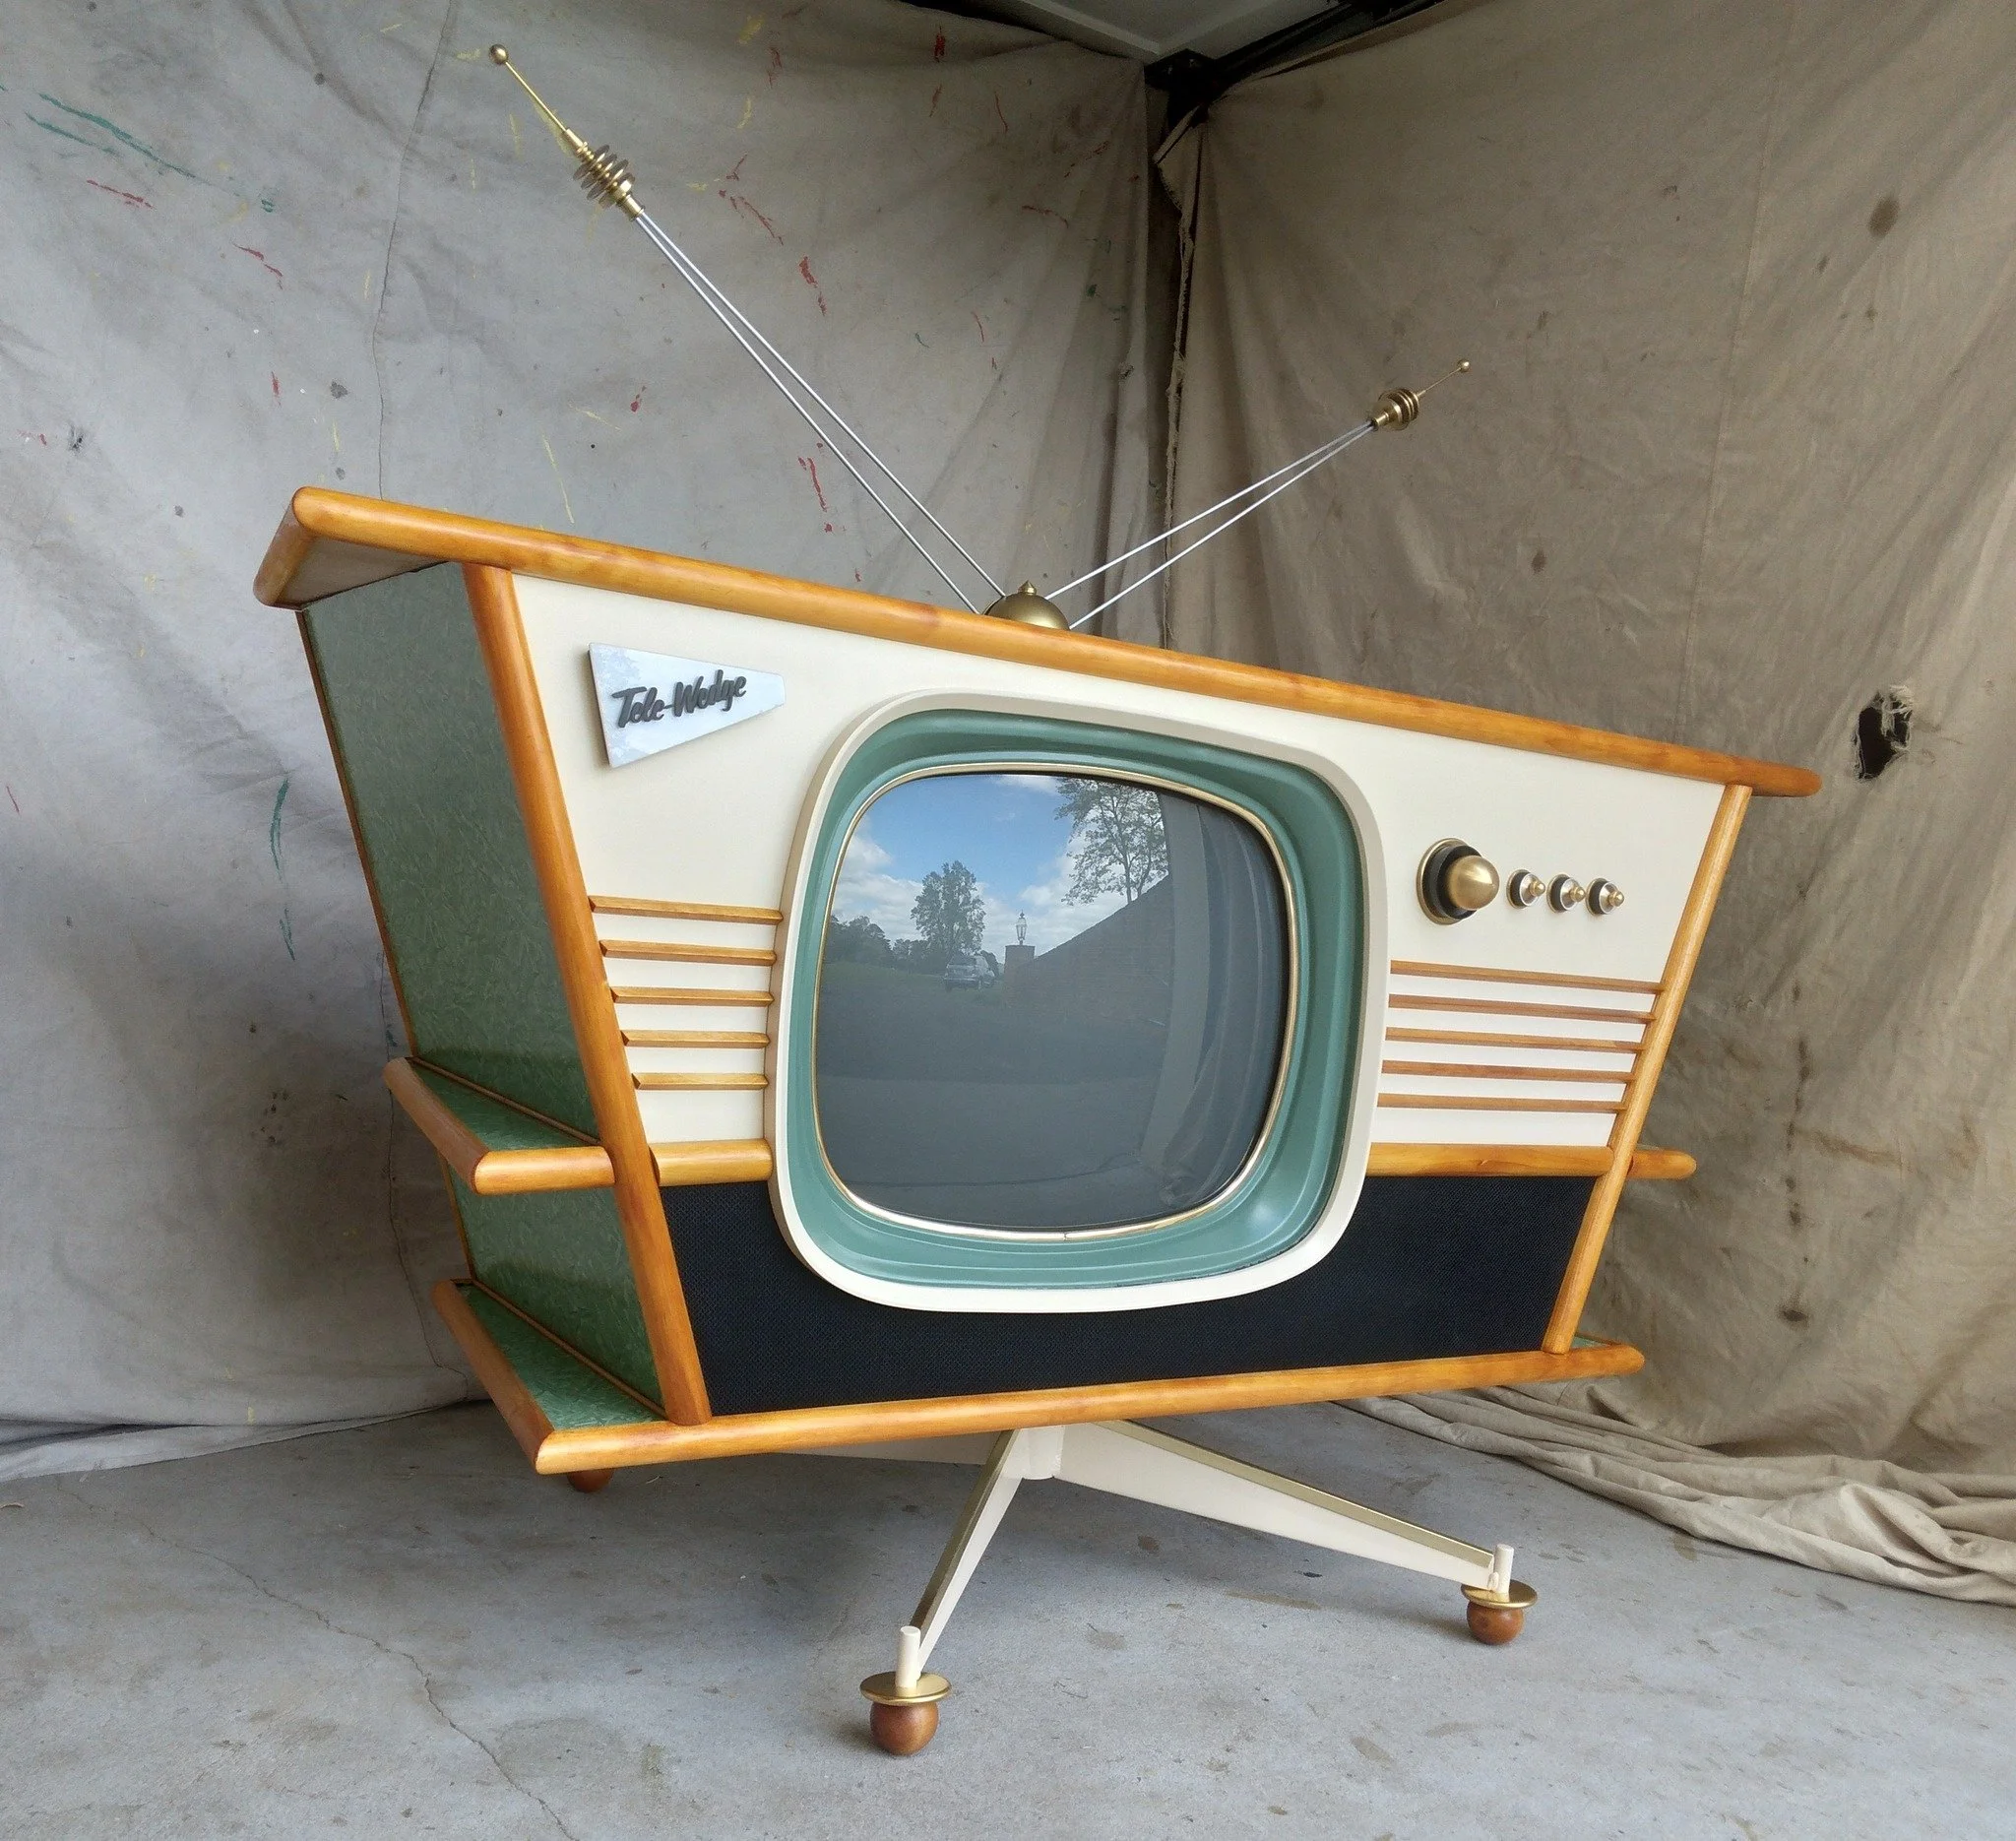
This is the Tele-Wedge Tiki 25. The TV is a 25 inch color Sharp CRT set from 2001. It has been mounted in a custom built cabinet.
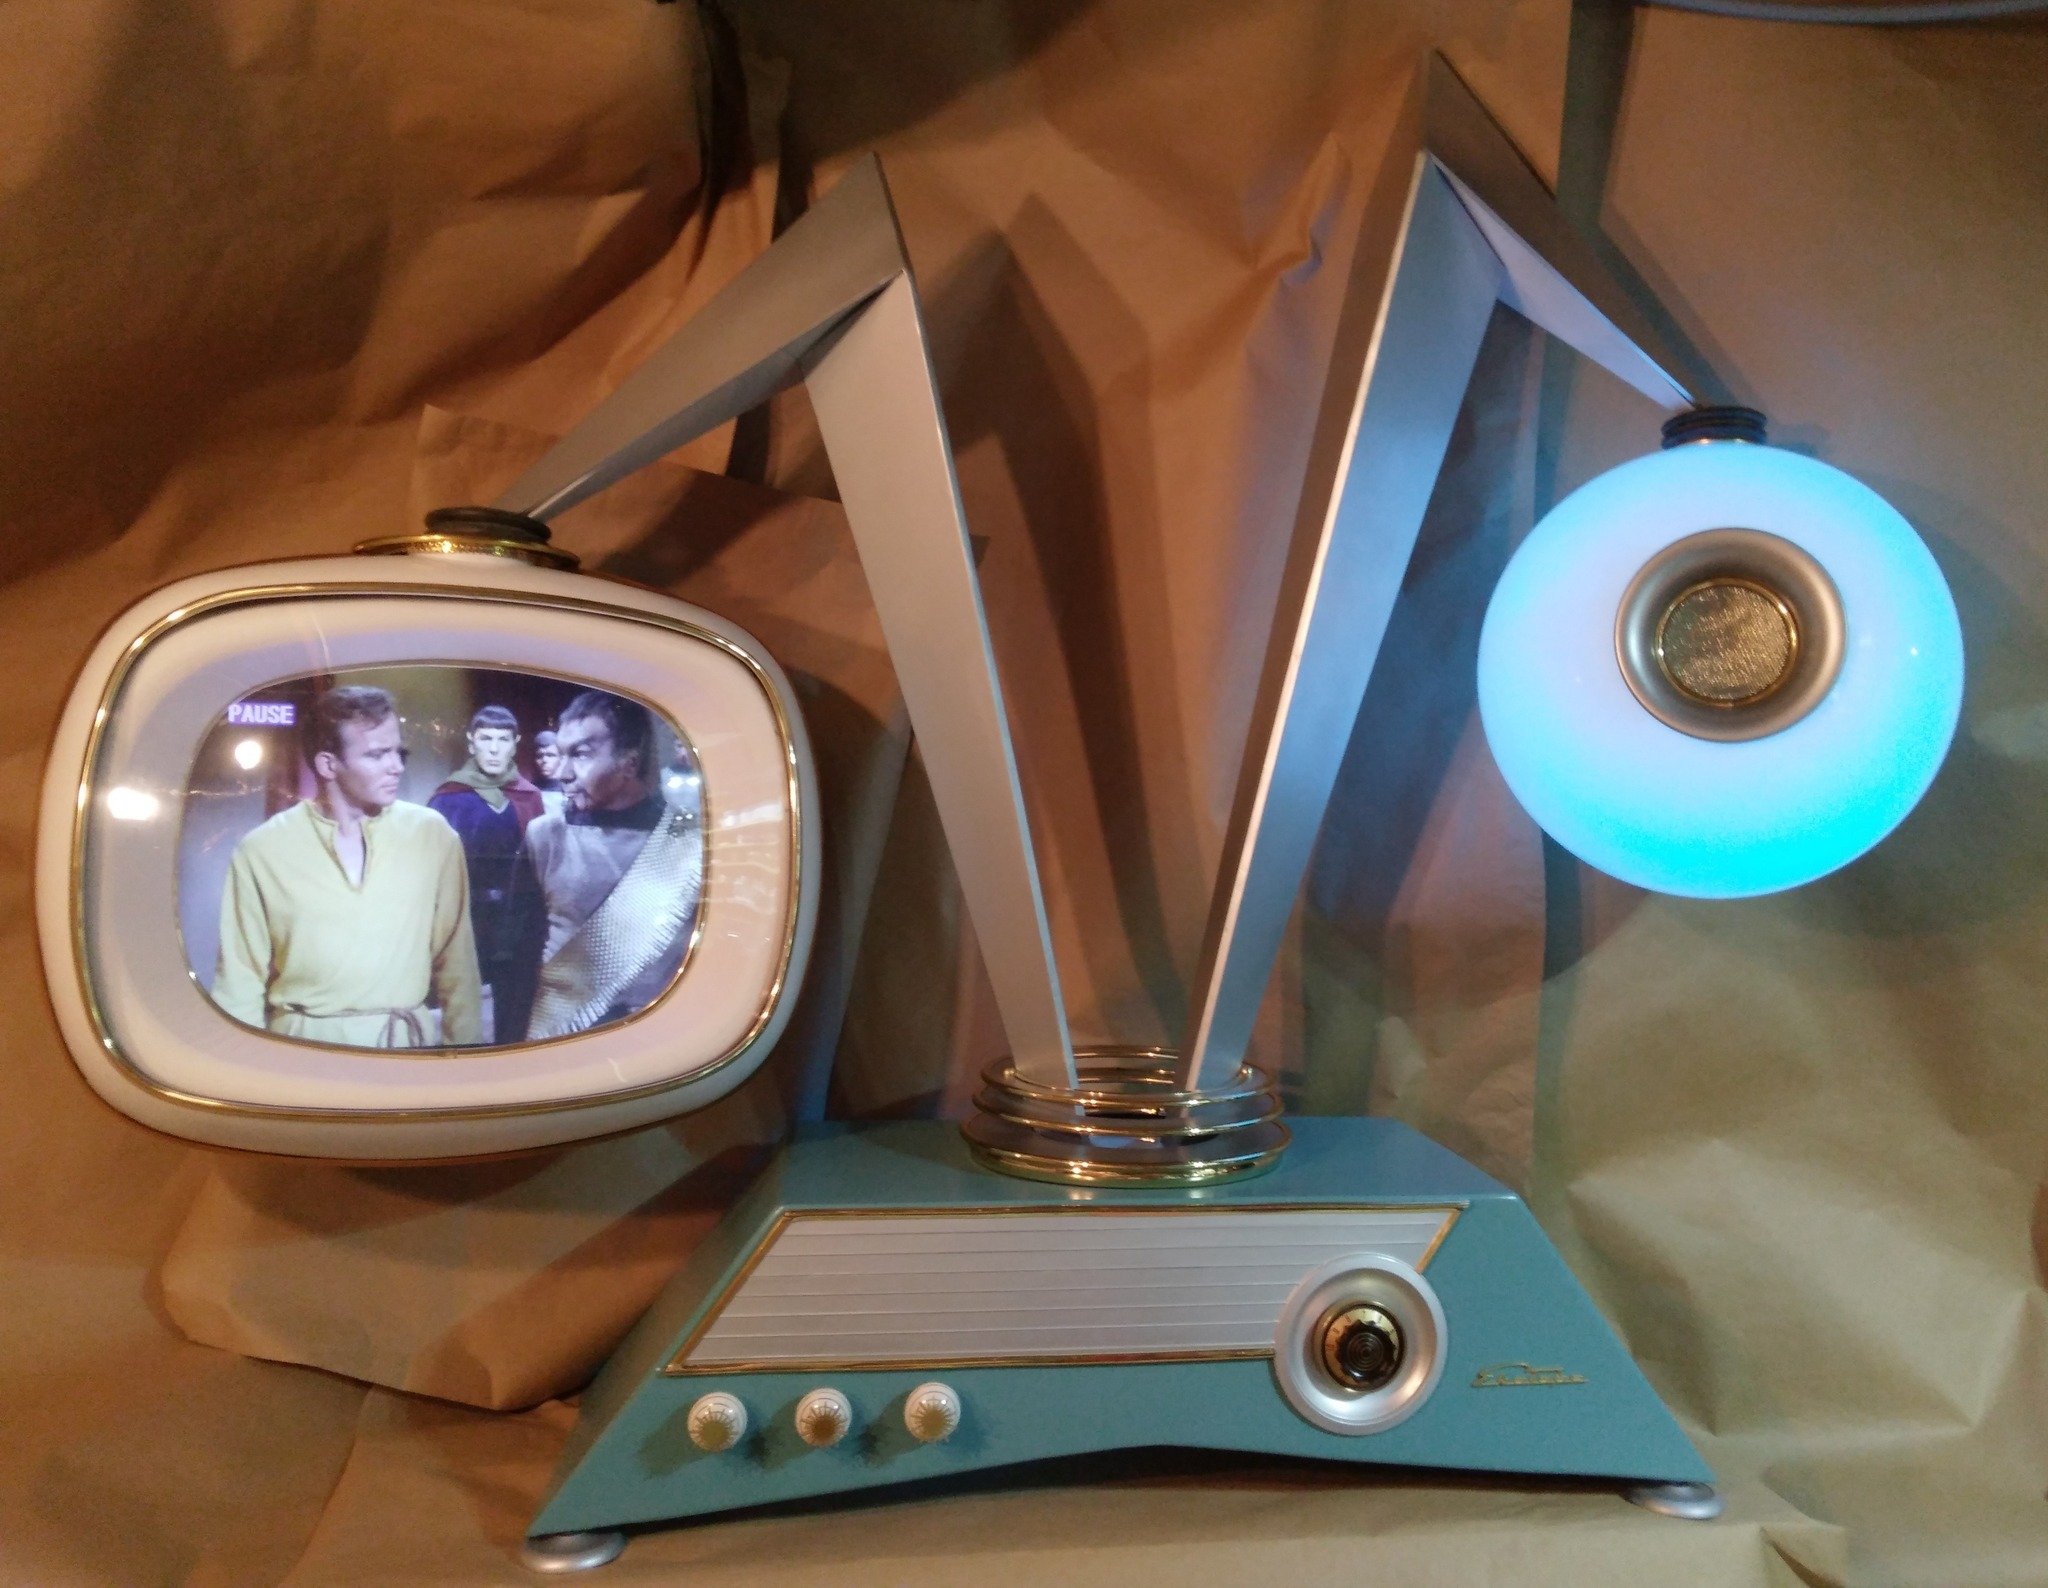
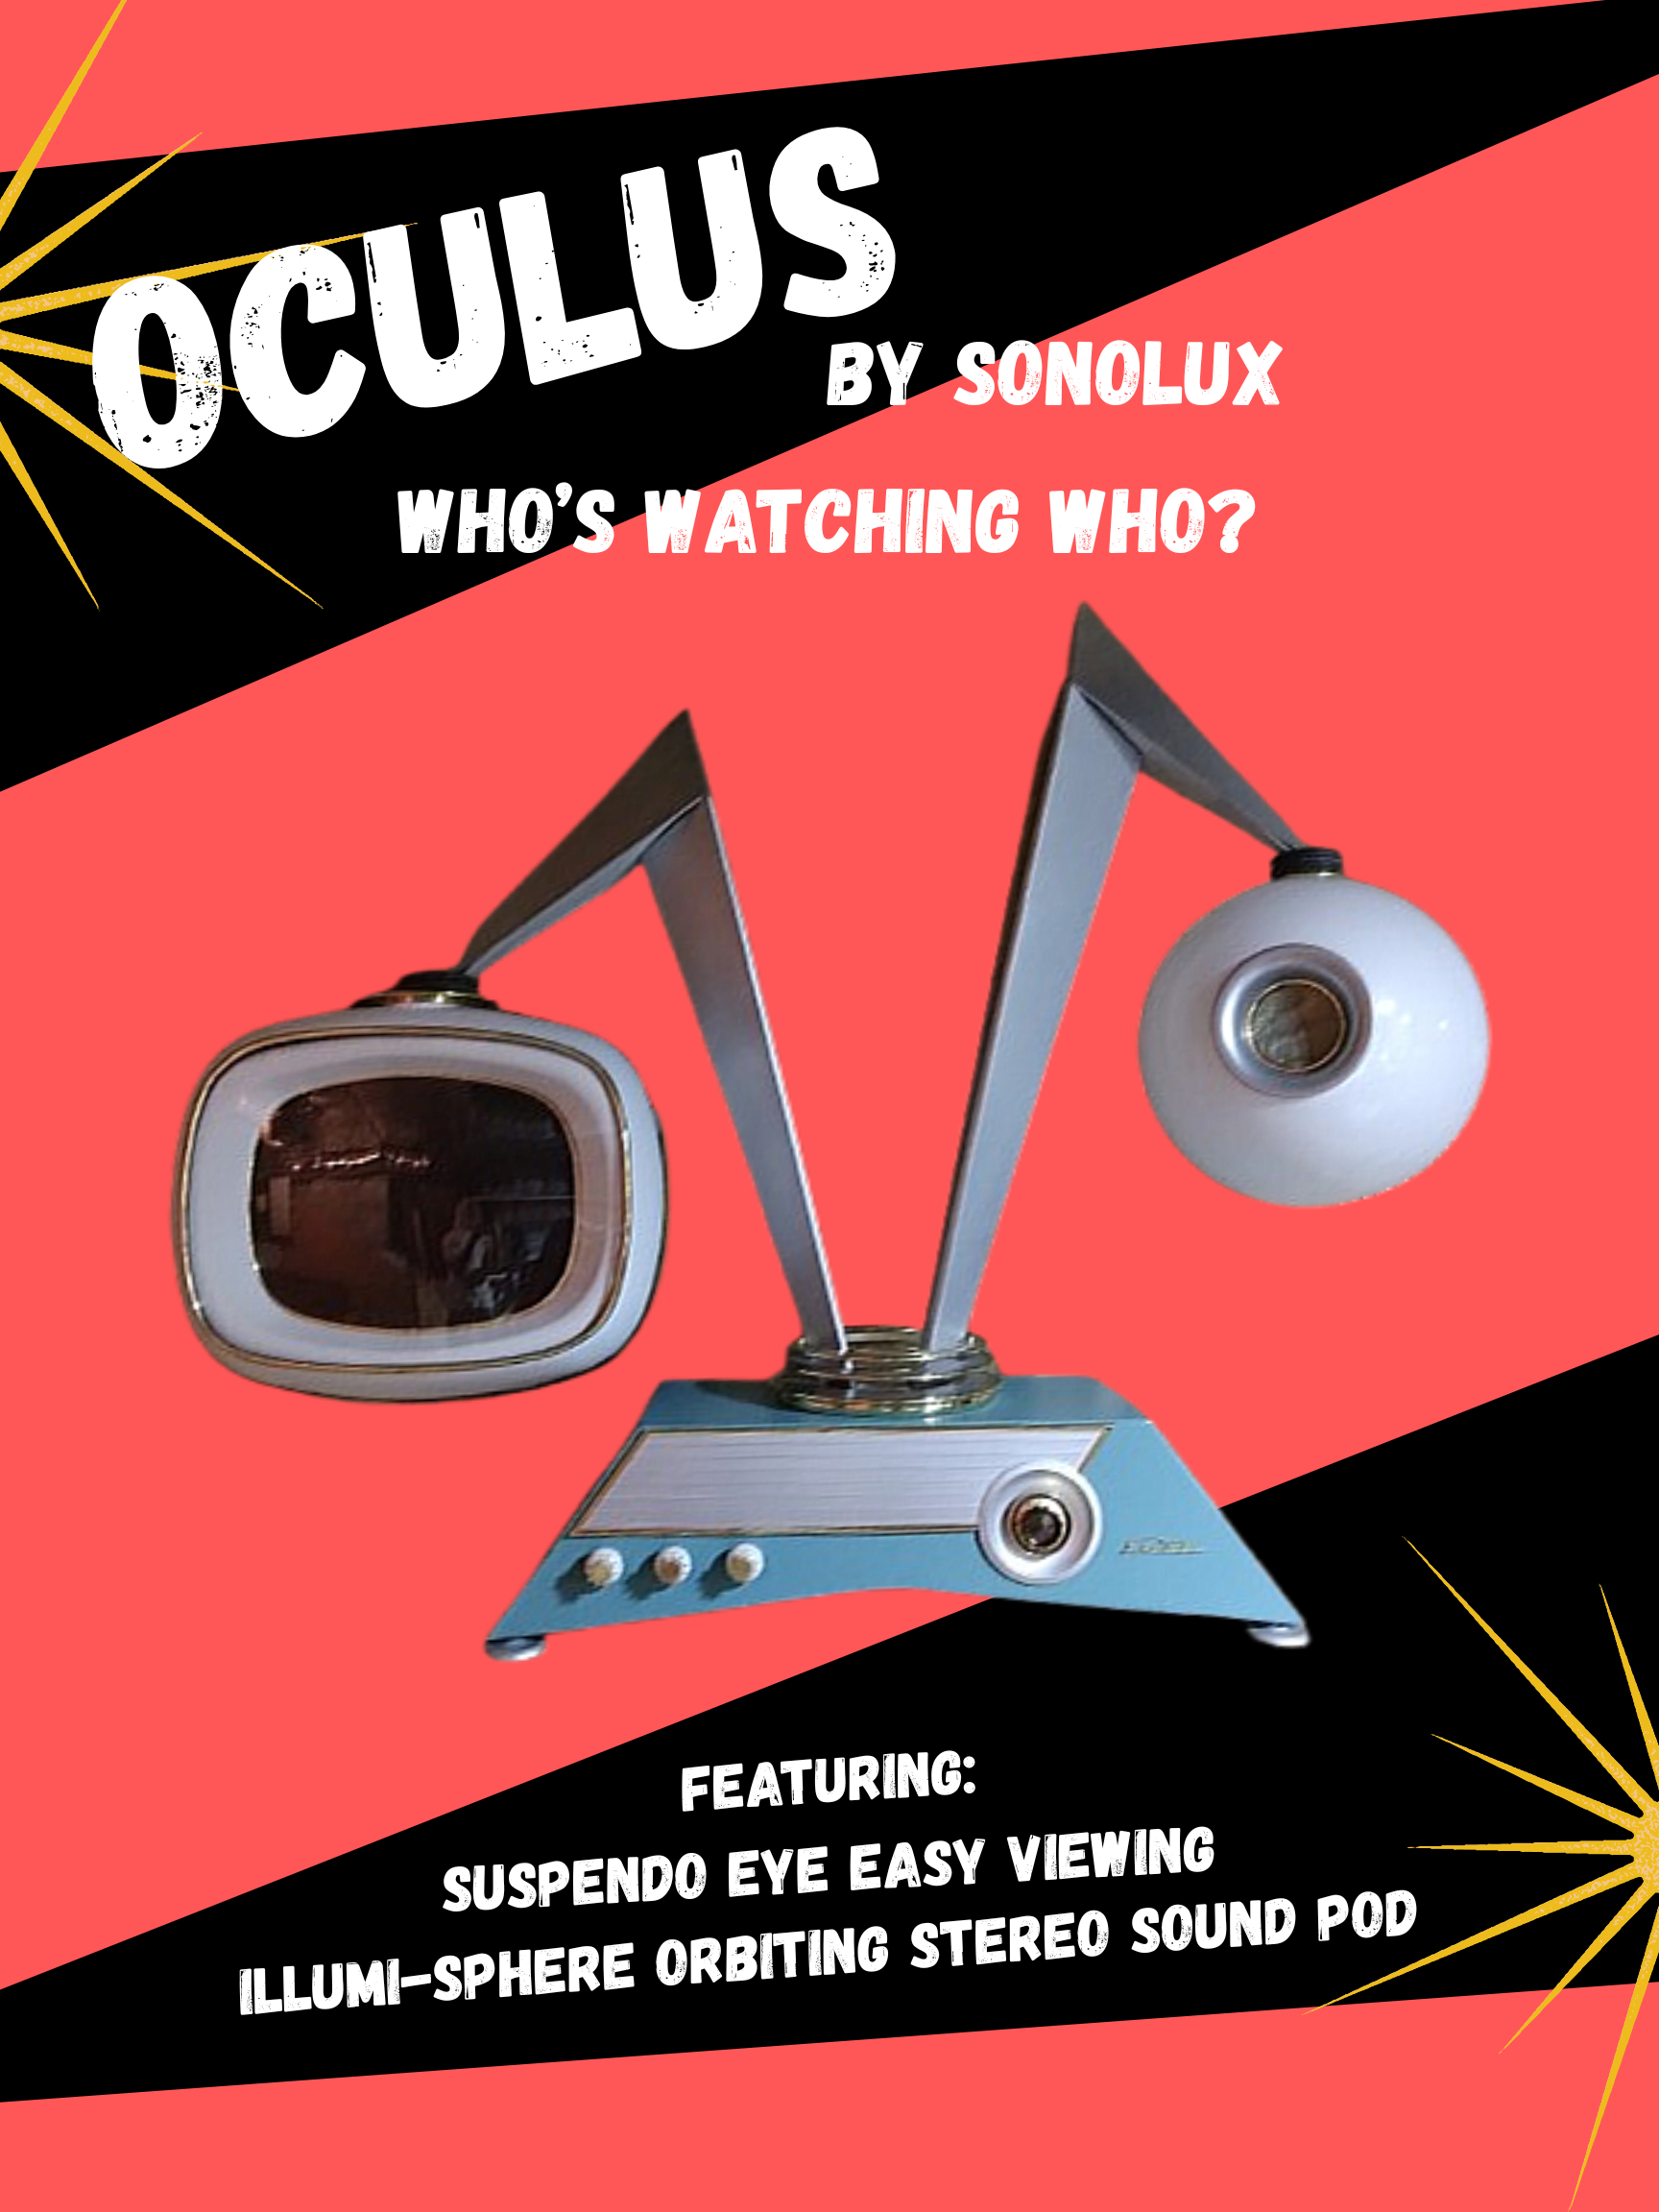
The Oculus - By Sonolux is a large scale 2 headed viewing station. The screen is a 19 inch LCD and the lighted sphere to the right houses 2 speakers.
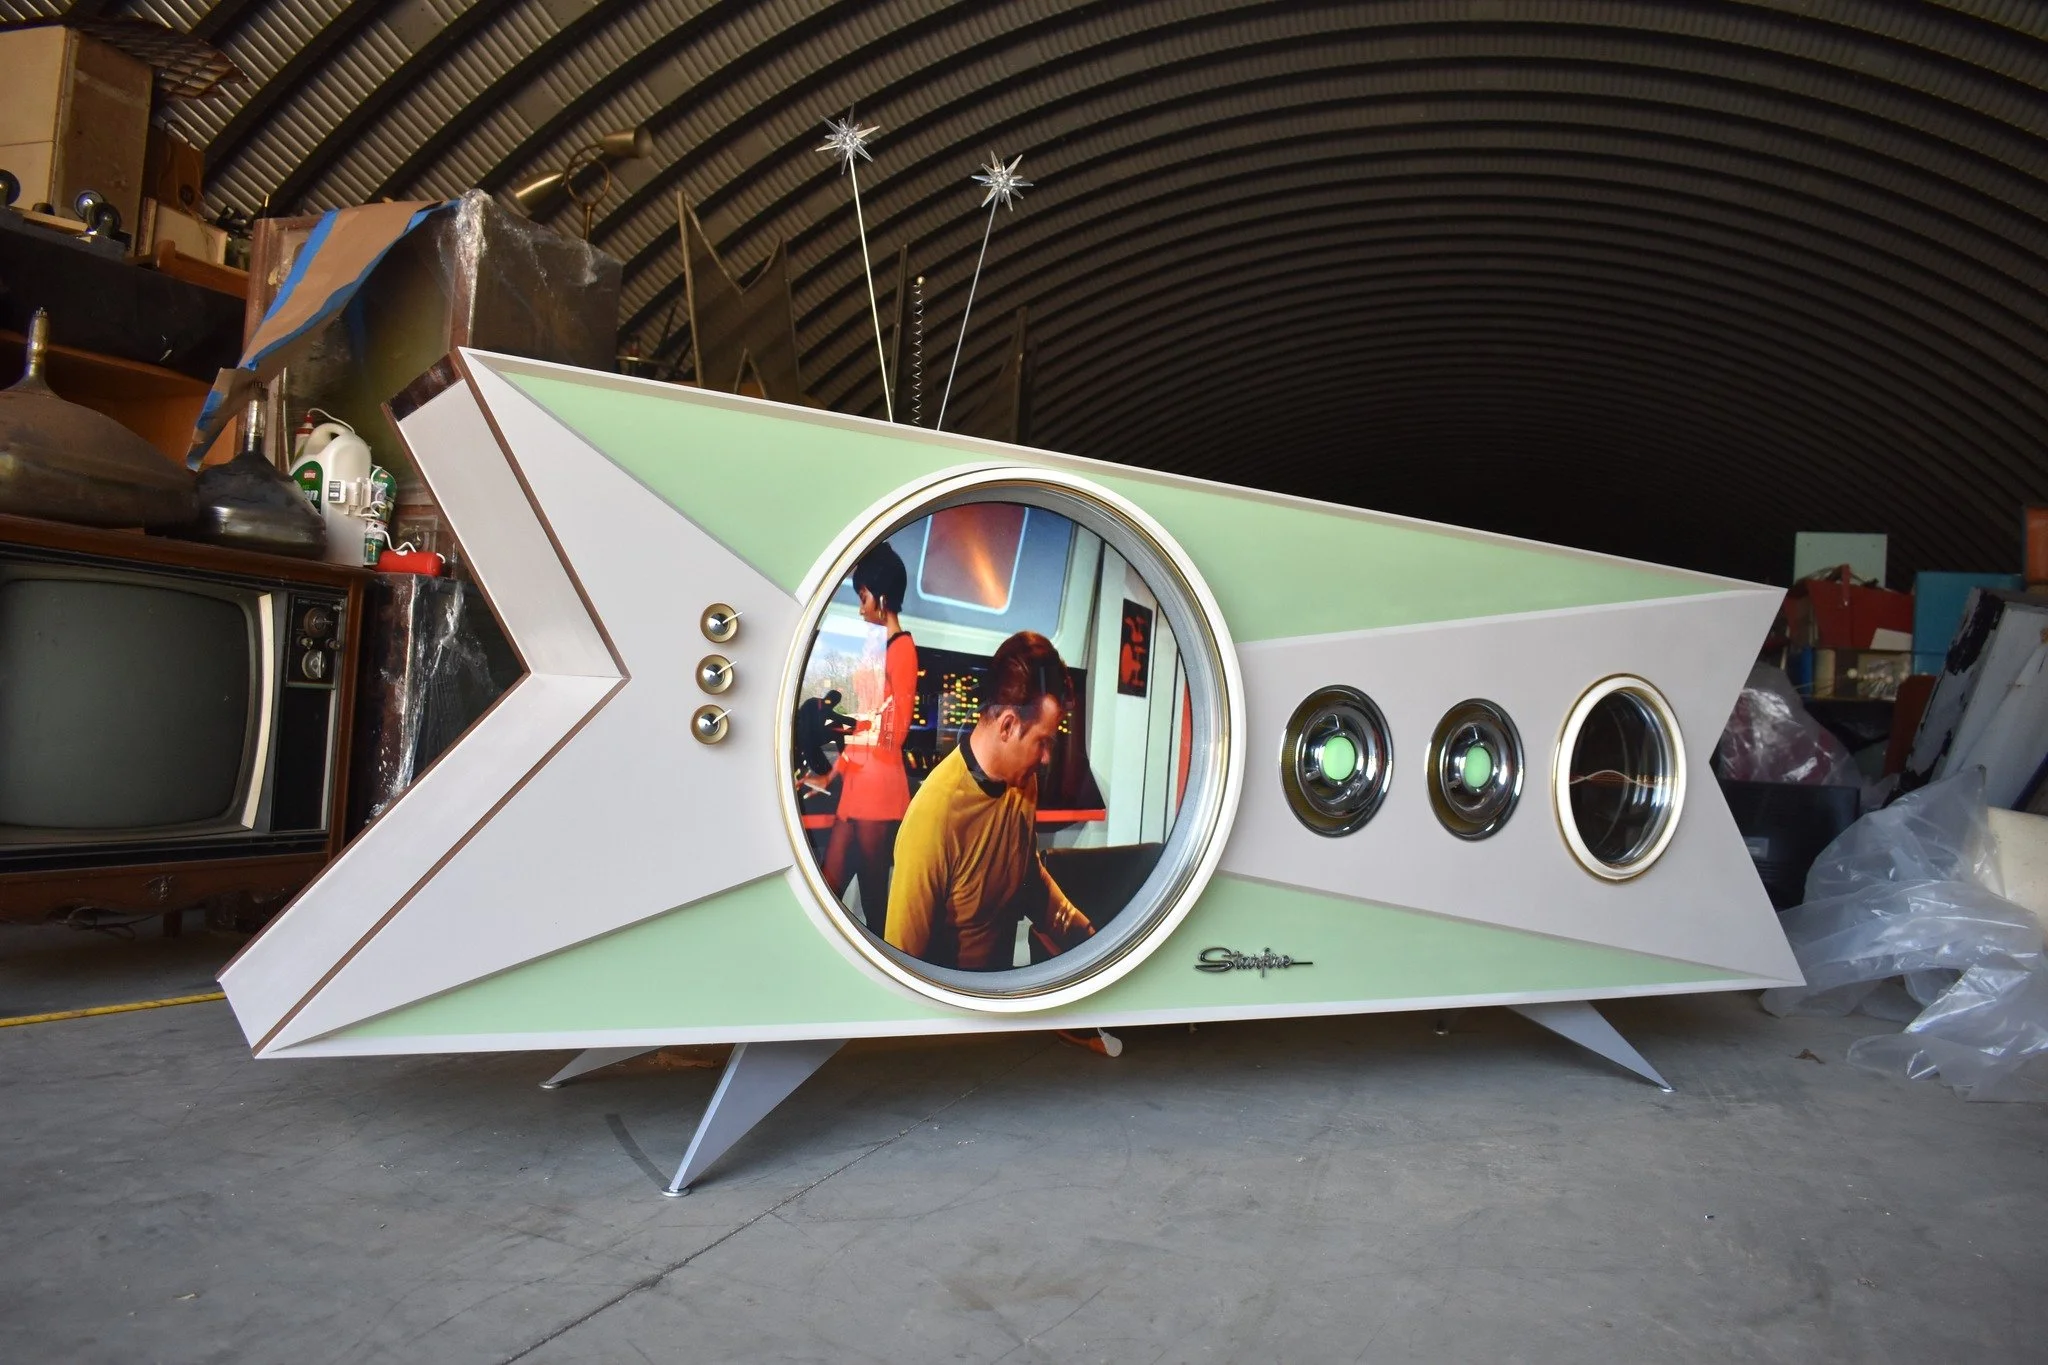
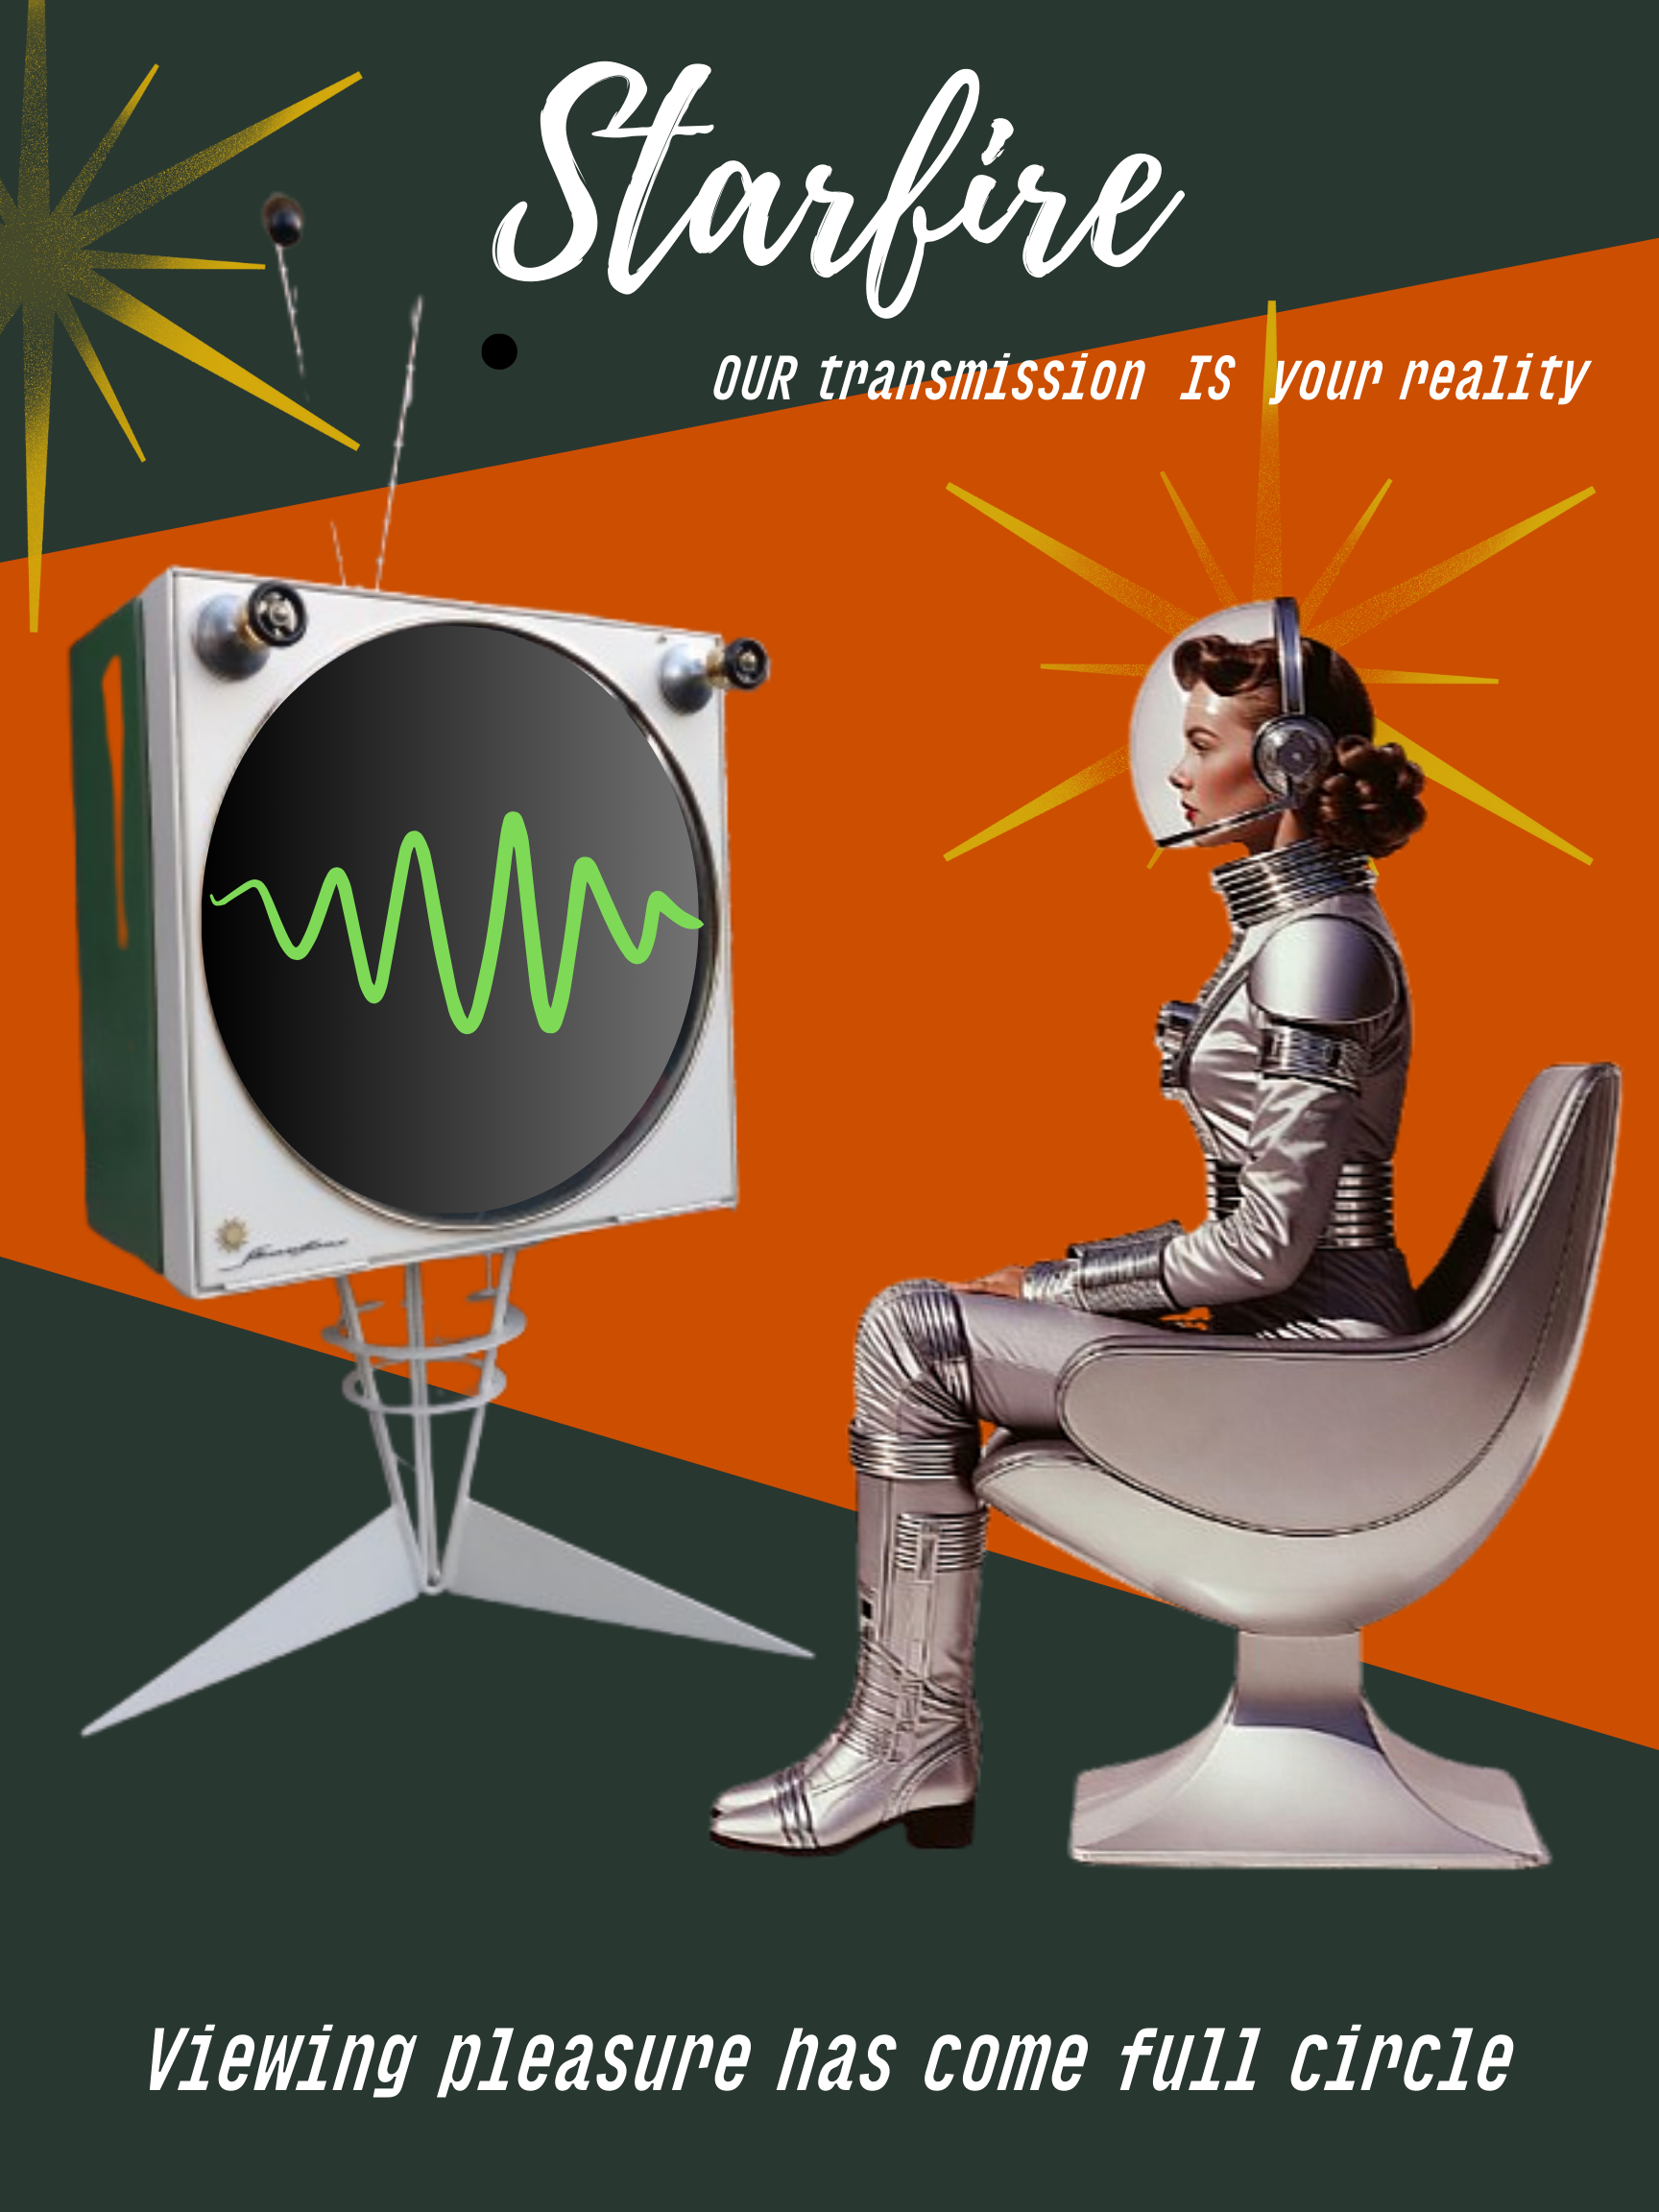
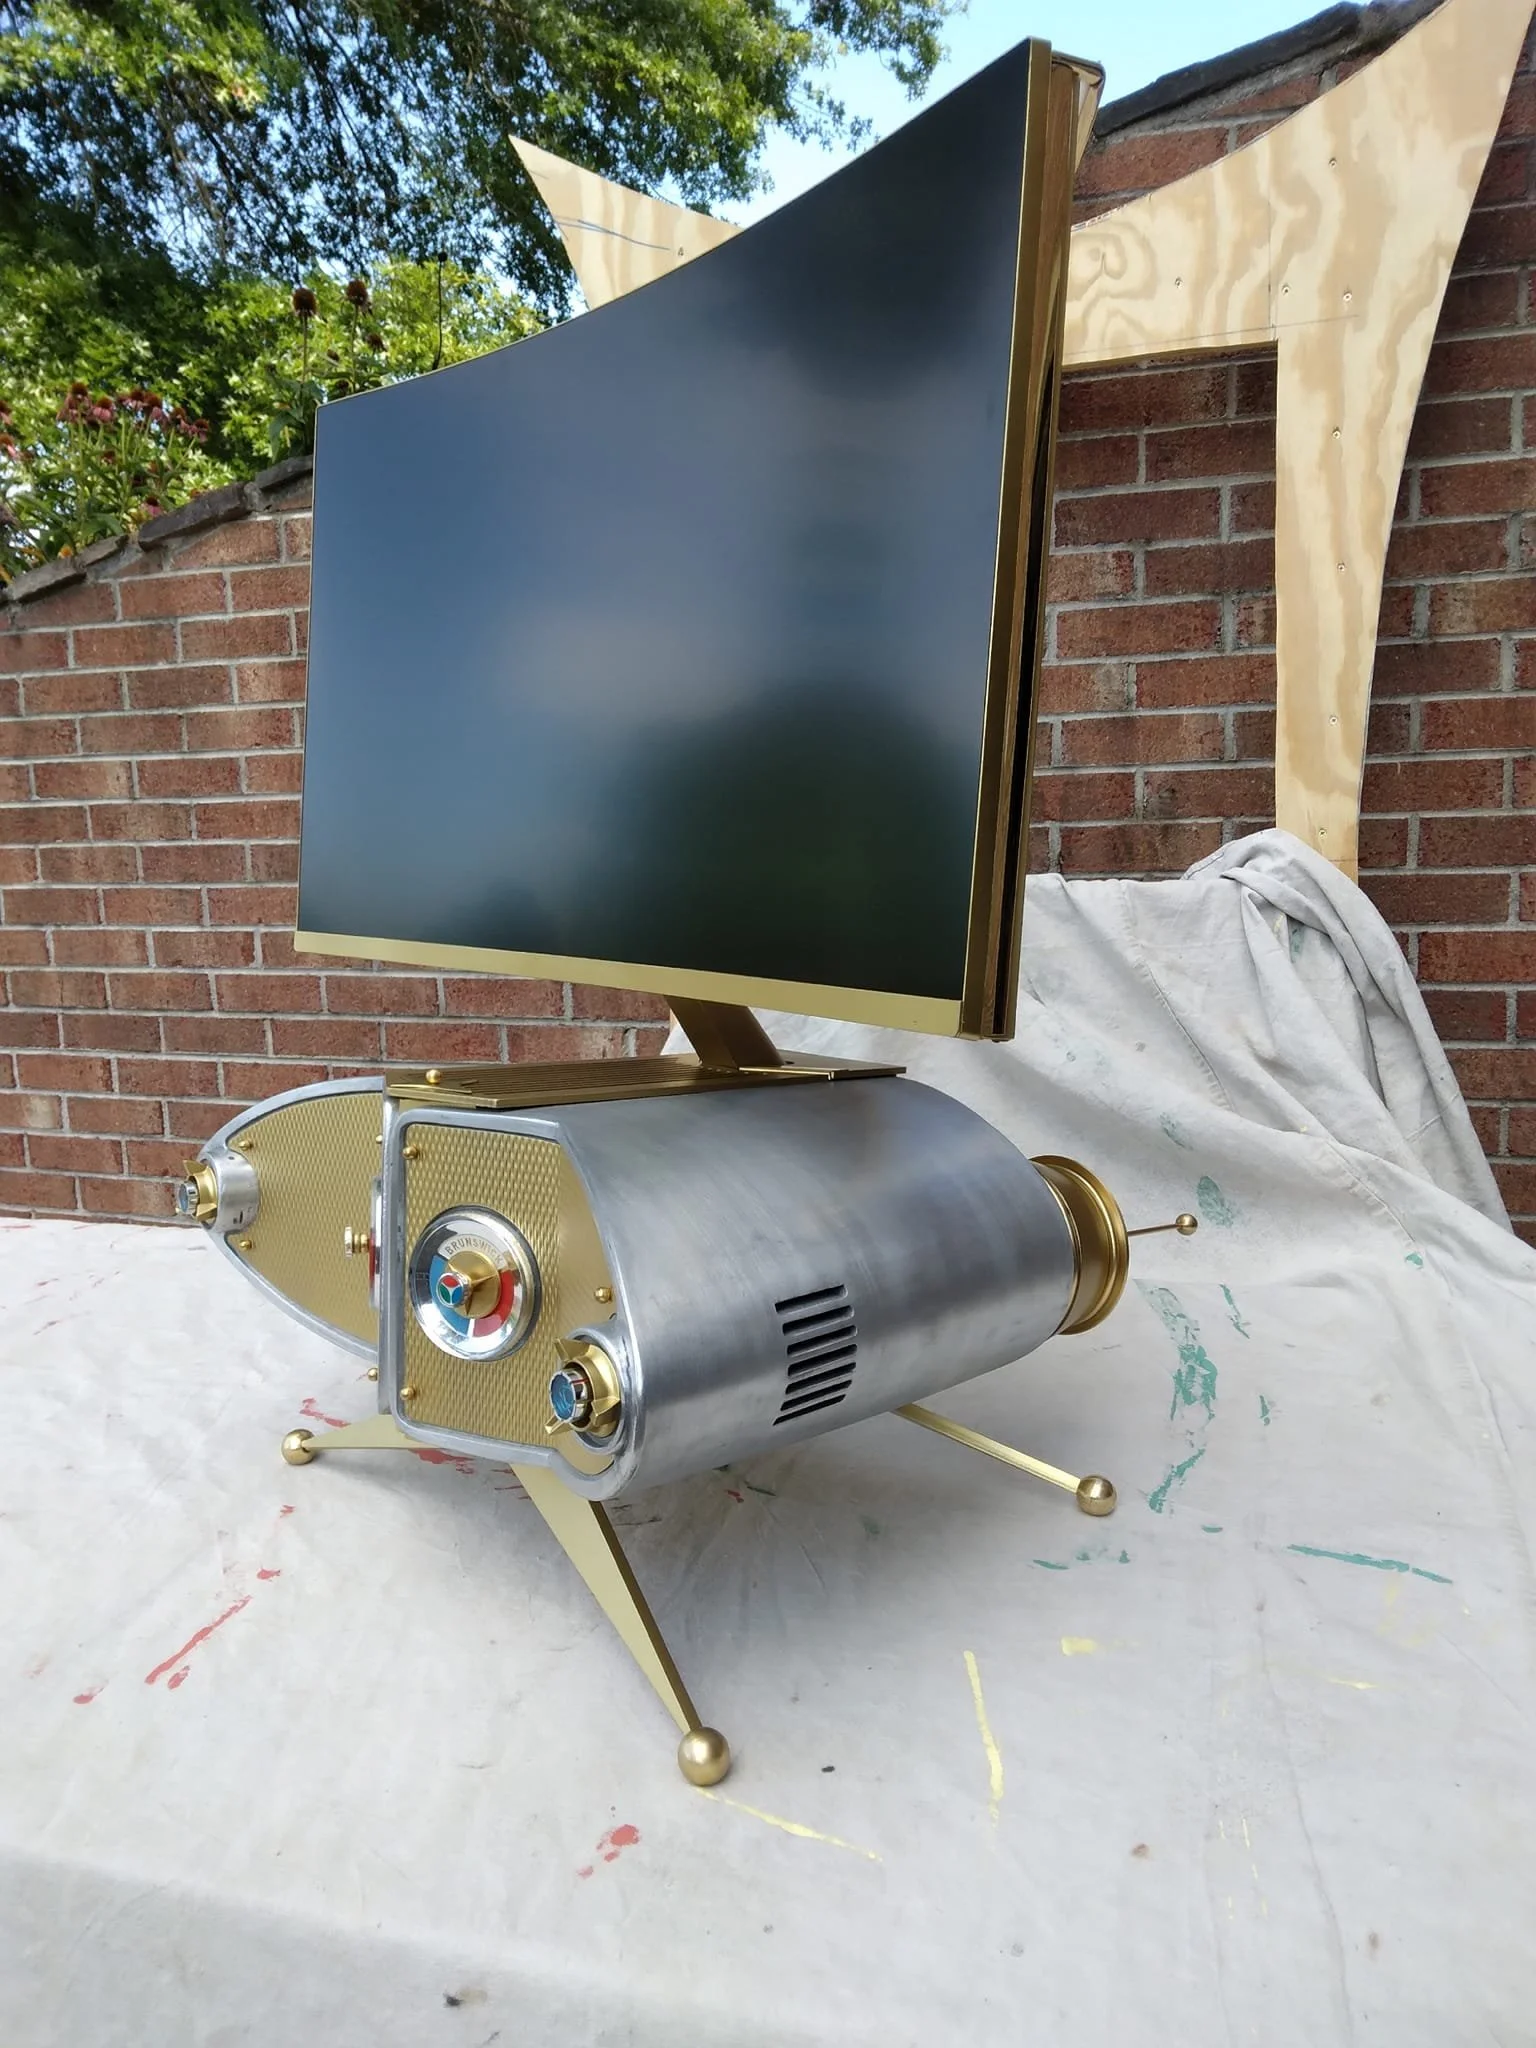
The Starfire console is a massive land yacht. It uses a 24.5 inch completely round lcd screen housed behind a vintage glass bubble which gives it the look of an old style crt. The screen on the far right plays oscilloscope sine wave patterns.
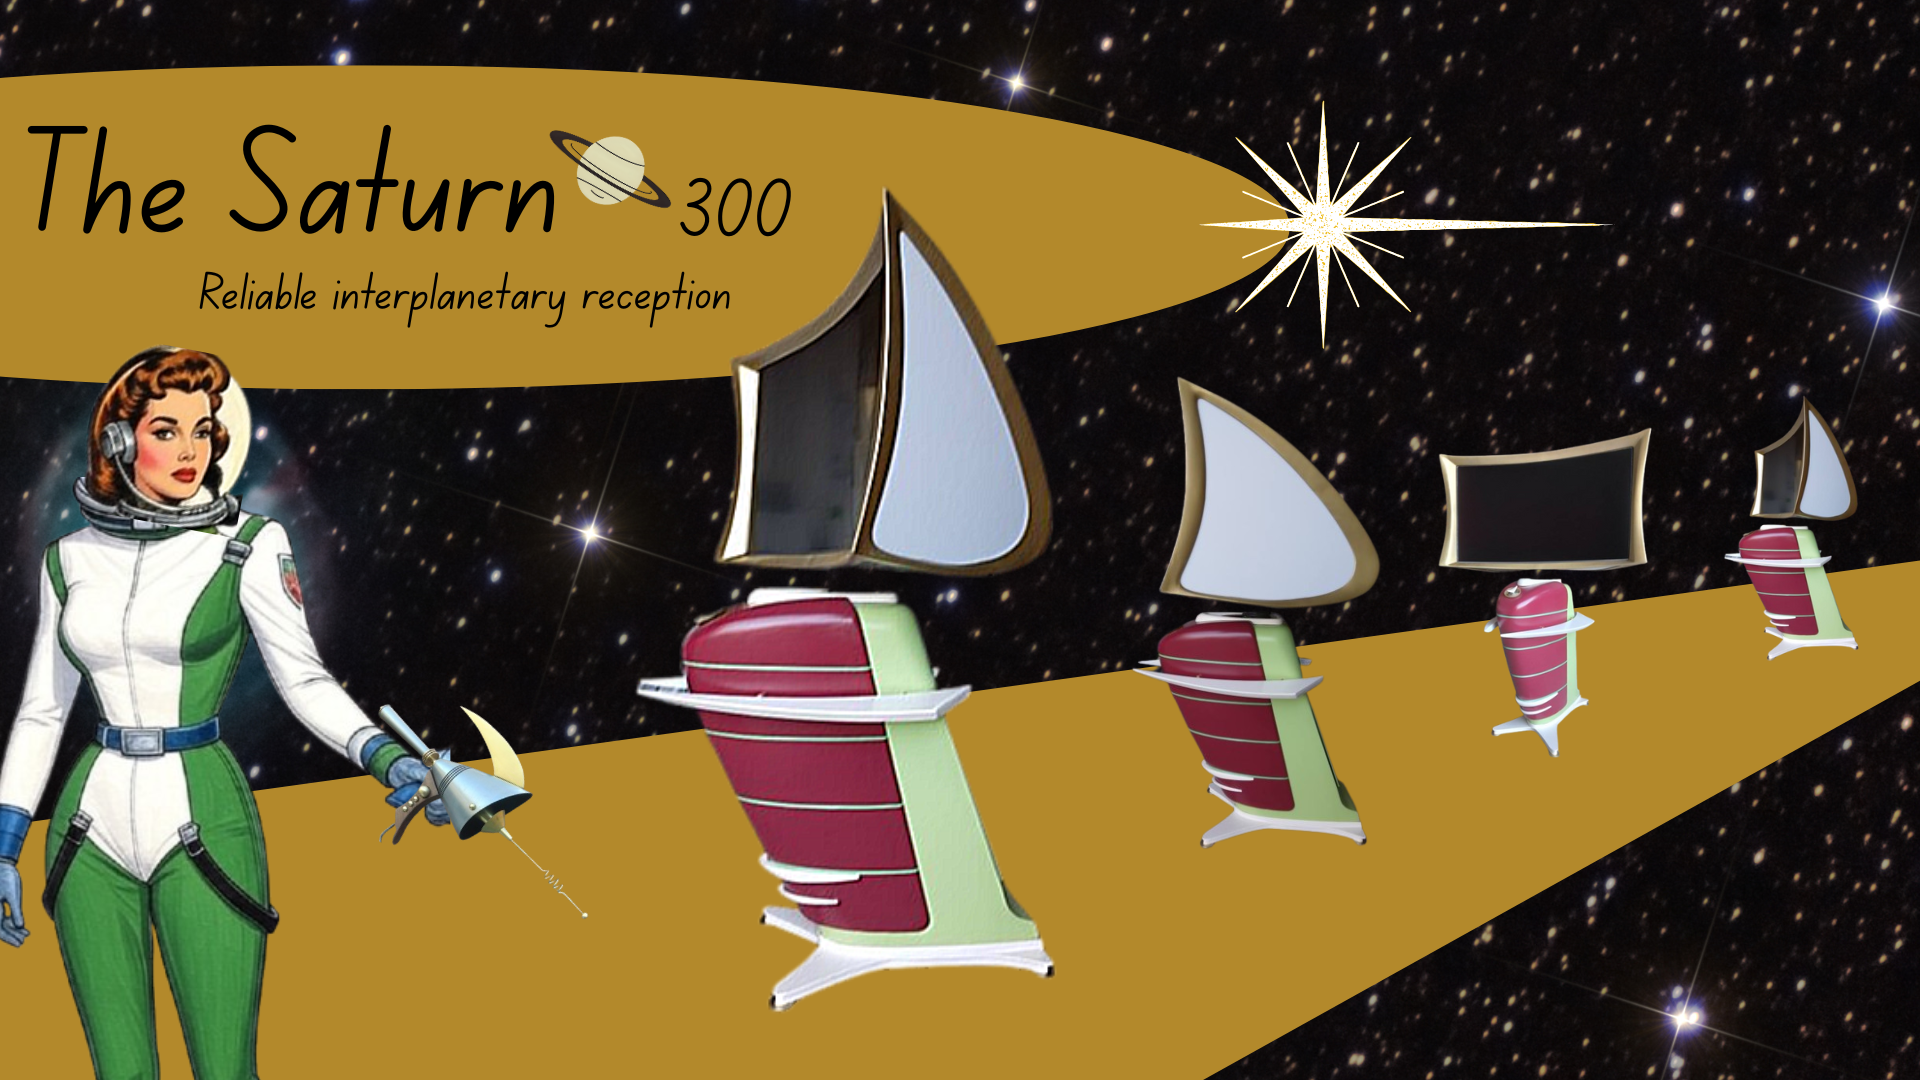
The Saturn 500 uses a 32” curved lcd monitor.
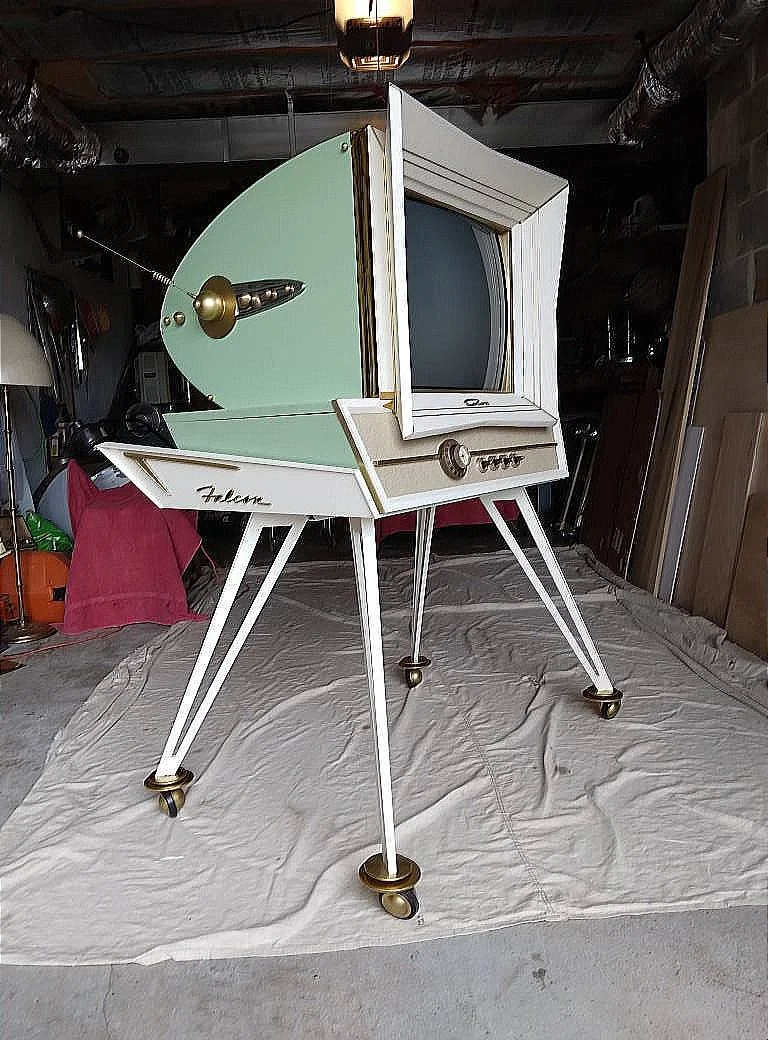
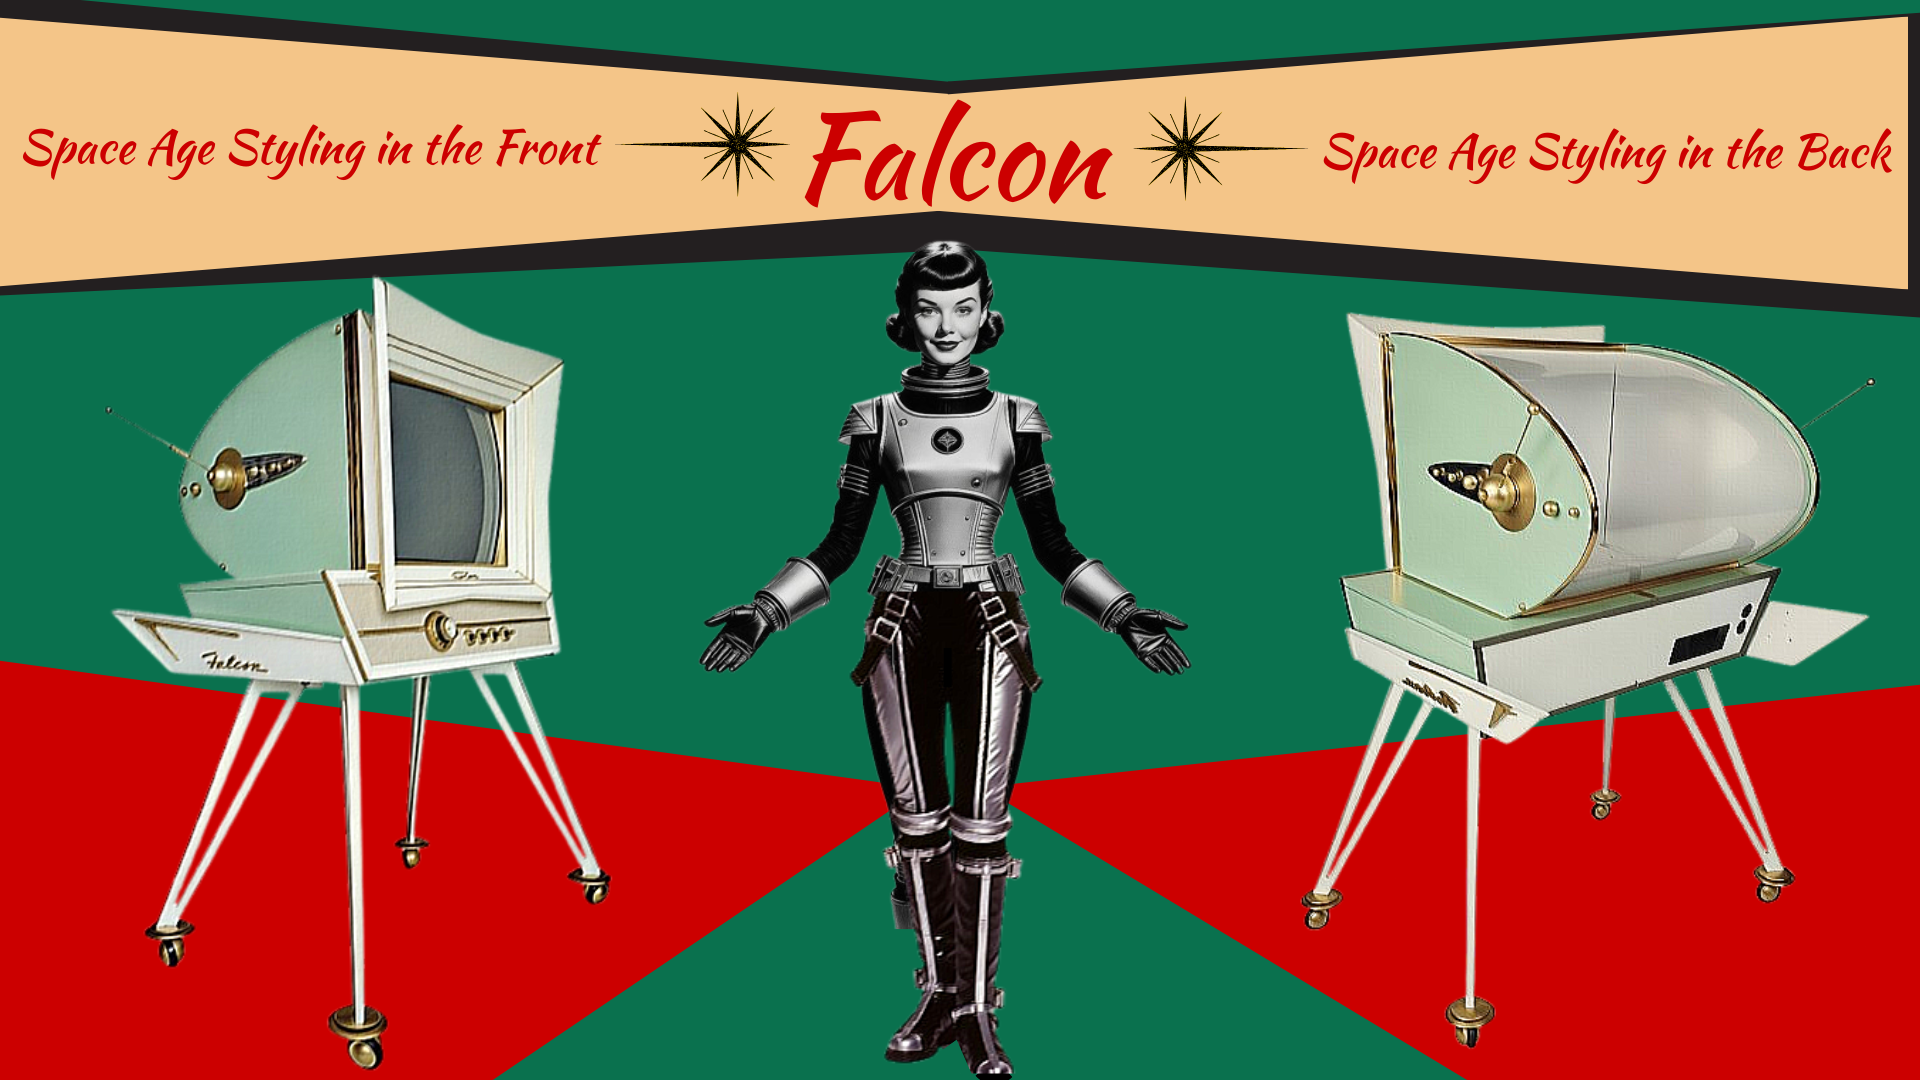
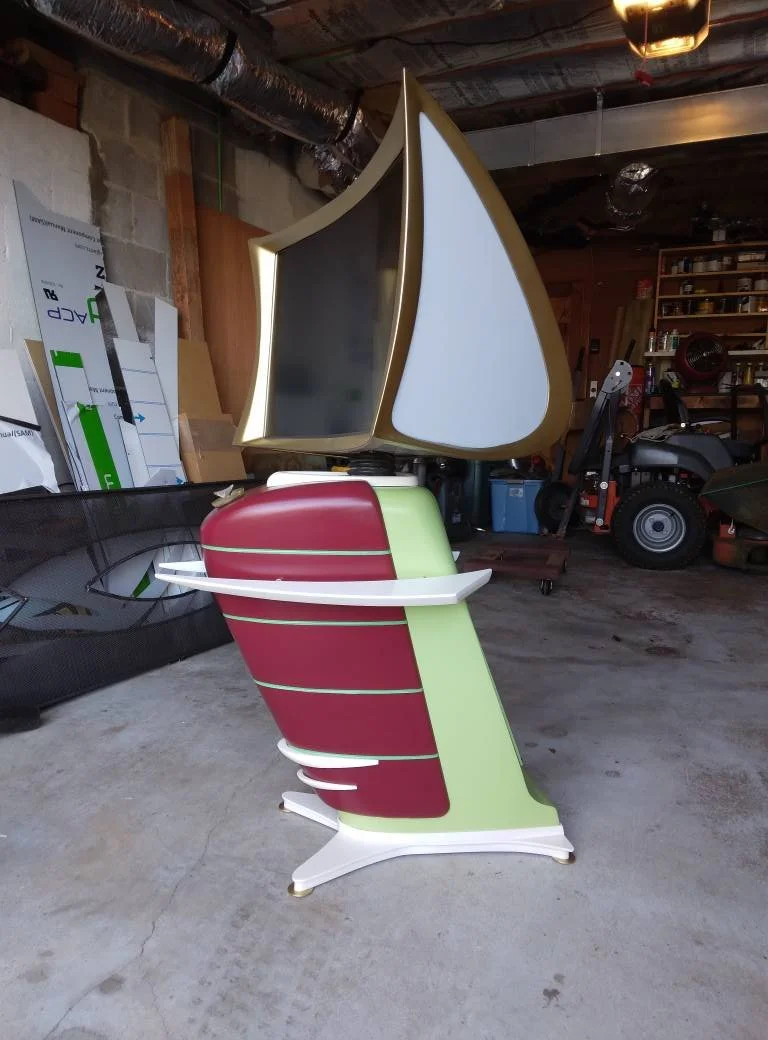
The Falcon is built around a vintage early 2000s 25 inch CRT Television.
The Starfire is built around a 24.5 inch round lcd flat screen with a glass bubble on the front.

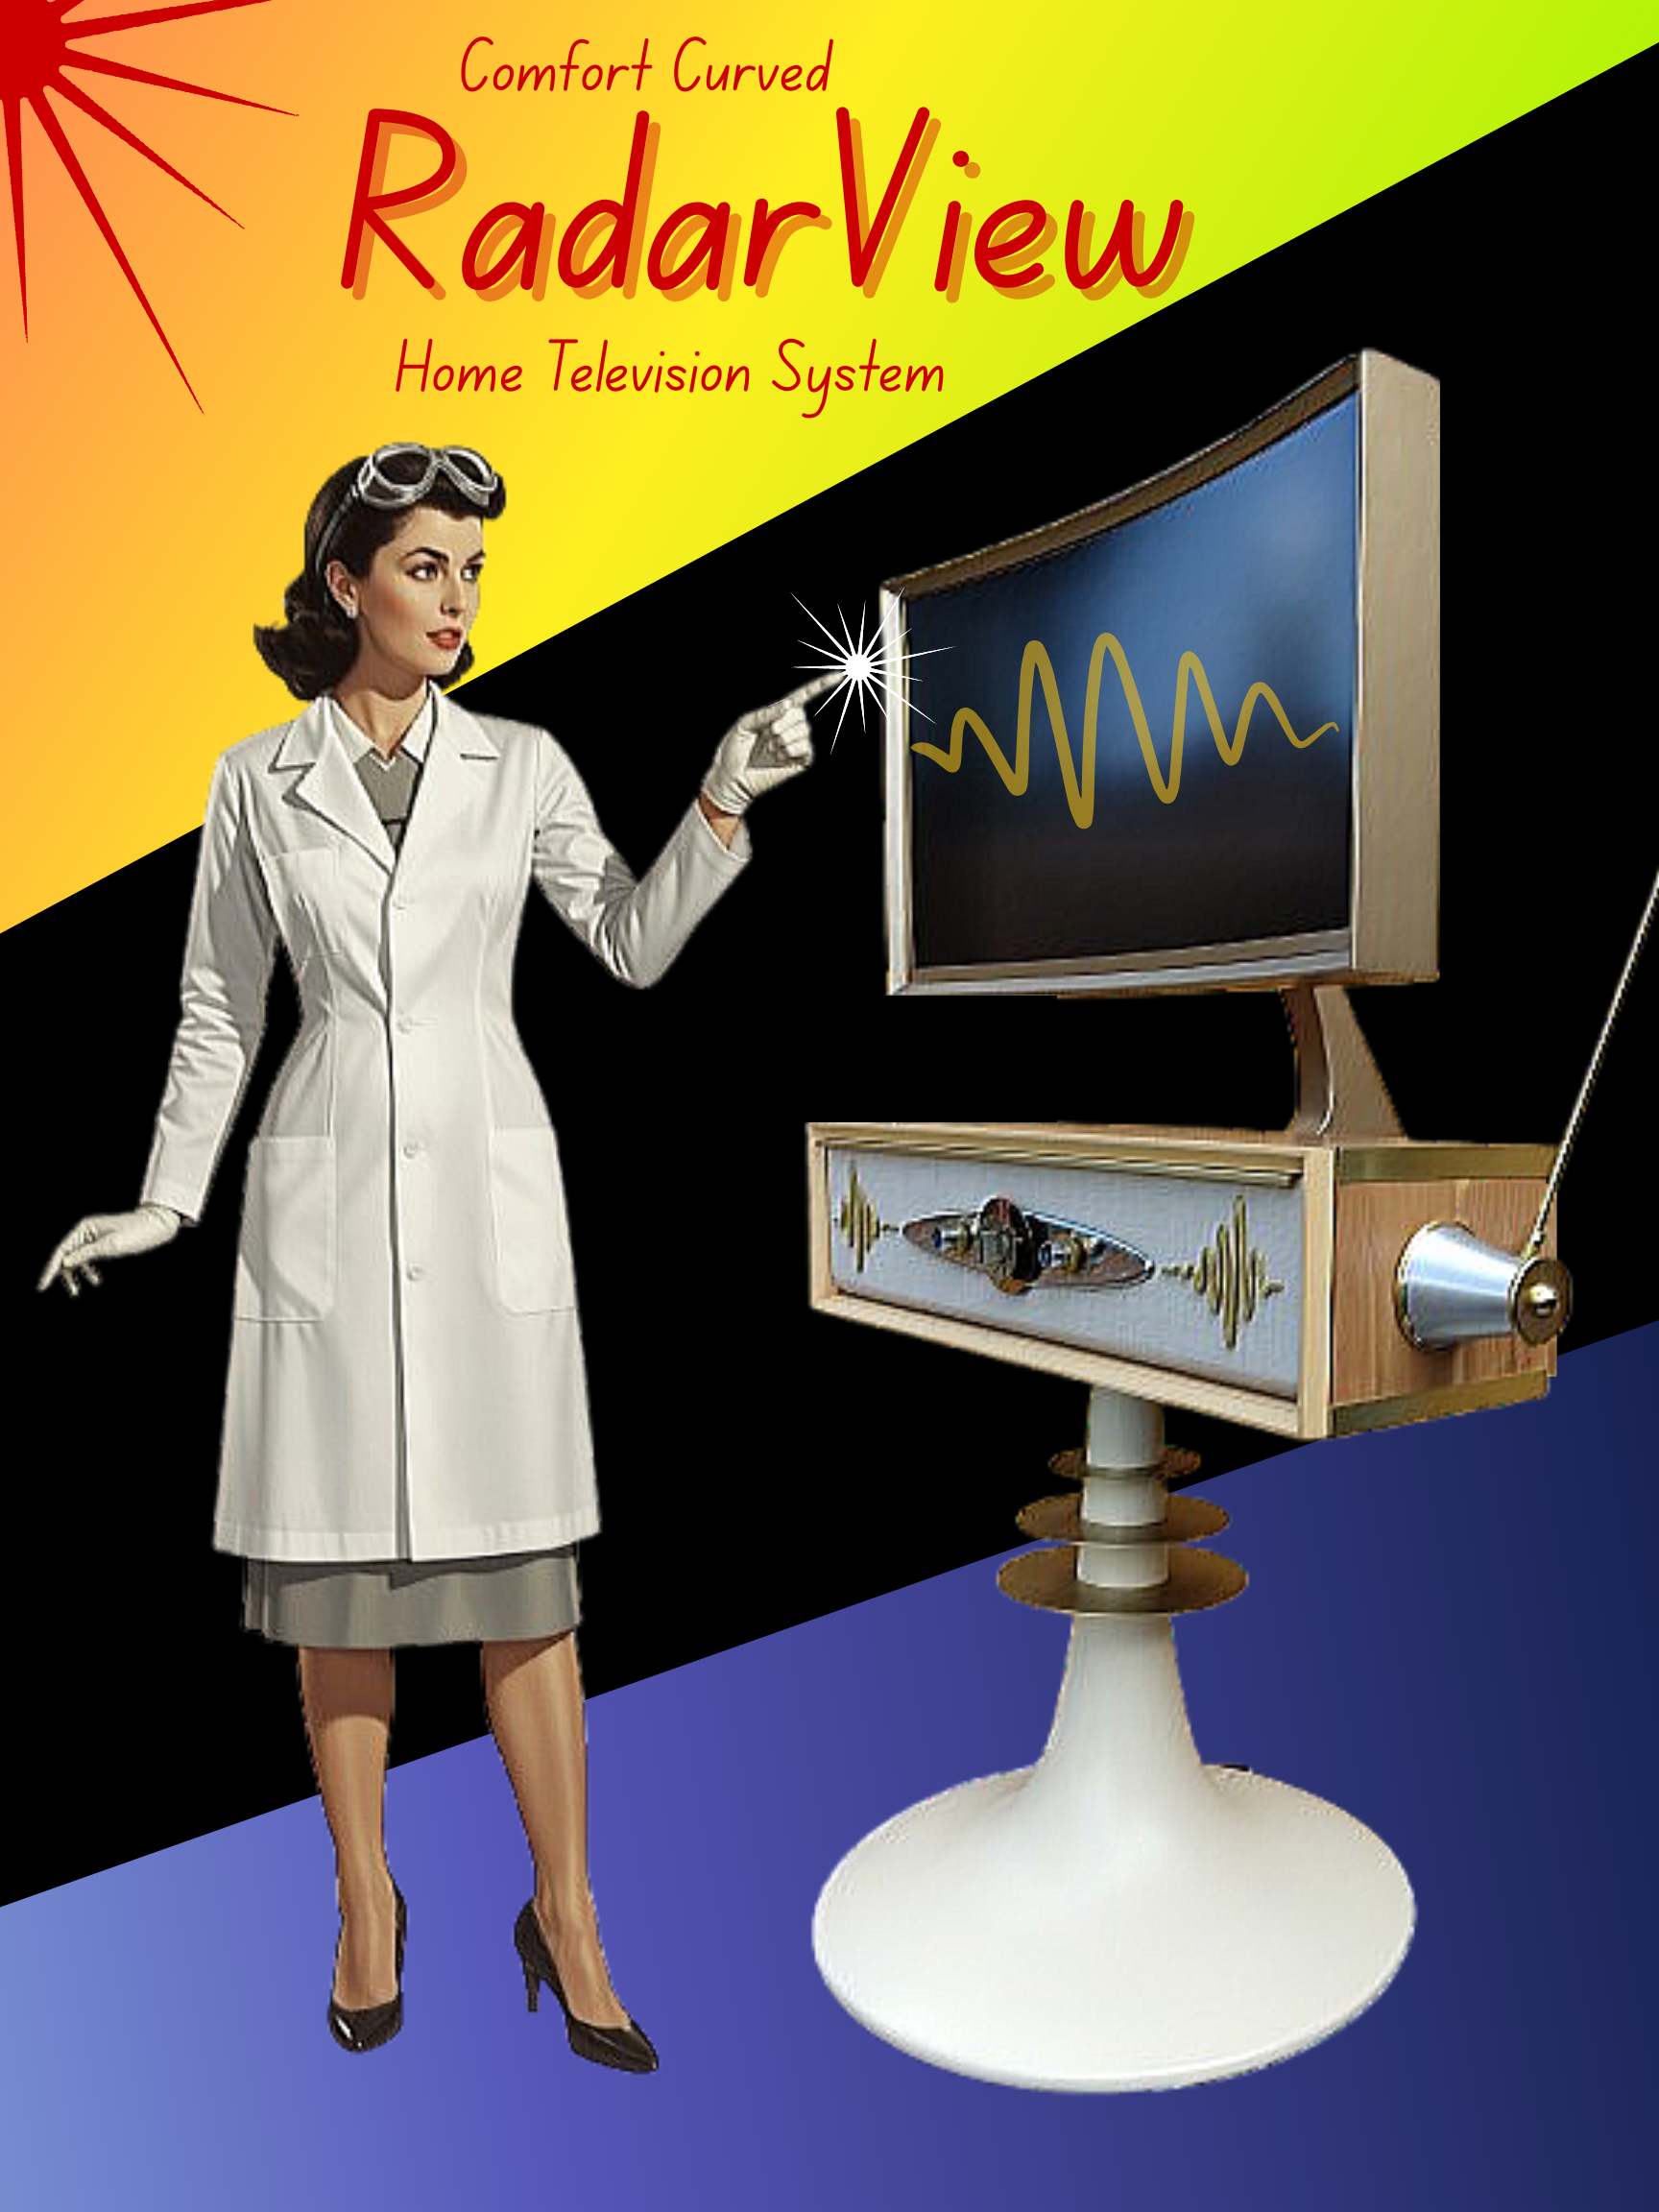
The Radar View - with a 32 inch curved lcd monitor.
The X-500 Interceptor also uses a 32 inch curved lcd.

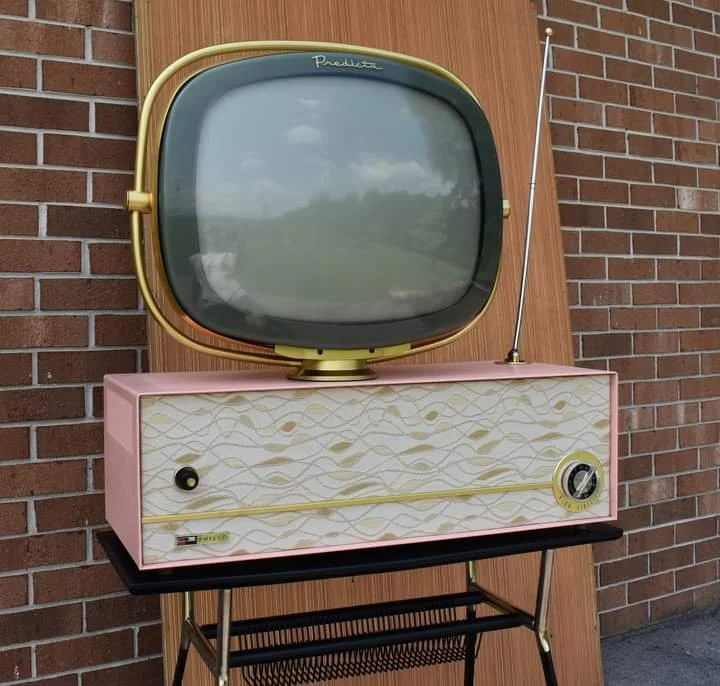
Since the Predicta is an iconic and epic form... pretty much a cornerstone of mid century and space age design... I figured I should build a special display for them. A note to all of my TV collector friends: Yes- I know that not all of these models came out in the same year - but this is a fantasy creation so I took some liberties.
This is a hybrid of a museum display and a period advertising display. When I was creating this- I imagined myself being at some uber atomic / futuristic dealer trade show back in the late 50's... and seeing the Predicta hype unveiled for the first time.
My original thought was to have every model and color /finish option displayed - but after a few sketches and rough layouts - I decided that made the display look too crowded and busy. I also left out the Princess model since the Debutante and Siesta kind of represent the product range in that series... and having six TVs displayed worked out well for the size of the platforms I built.
I debated on displaying the Tandem with the screen off of the base and sitting on a pedestal behind in order to show the independence of the screen from the base. I still might add that - but for now I opted for having the screen directly on the base.
I tried to incorporate some recurring shapes and themes from the actual sets themselves and the original Predicta advertising booklet. Things like the green tones - the gold edge band trim - and the elongated triangle wedge shapes.
Now that I am looking at it all set up - I will probably also add some hidden LED strip lights under the front signs so that there is a glow between the 2 layers of sign panels.
More pics in the gallery!
I am just finishing up 2 of these now. It is a big set using a 32” (New old stock) SHARP CRT and chassis from 2001. Flip down door for a small DVD player. Backlit screen surround mask with LED lights operating on a remote. They can be set to any color and also a few different fade or strobe options. The TV is pretty heavy so to ensure that there would be no issues with stability - the legs are crafted from heavy welded steel. More pics in the gallery!

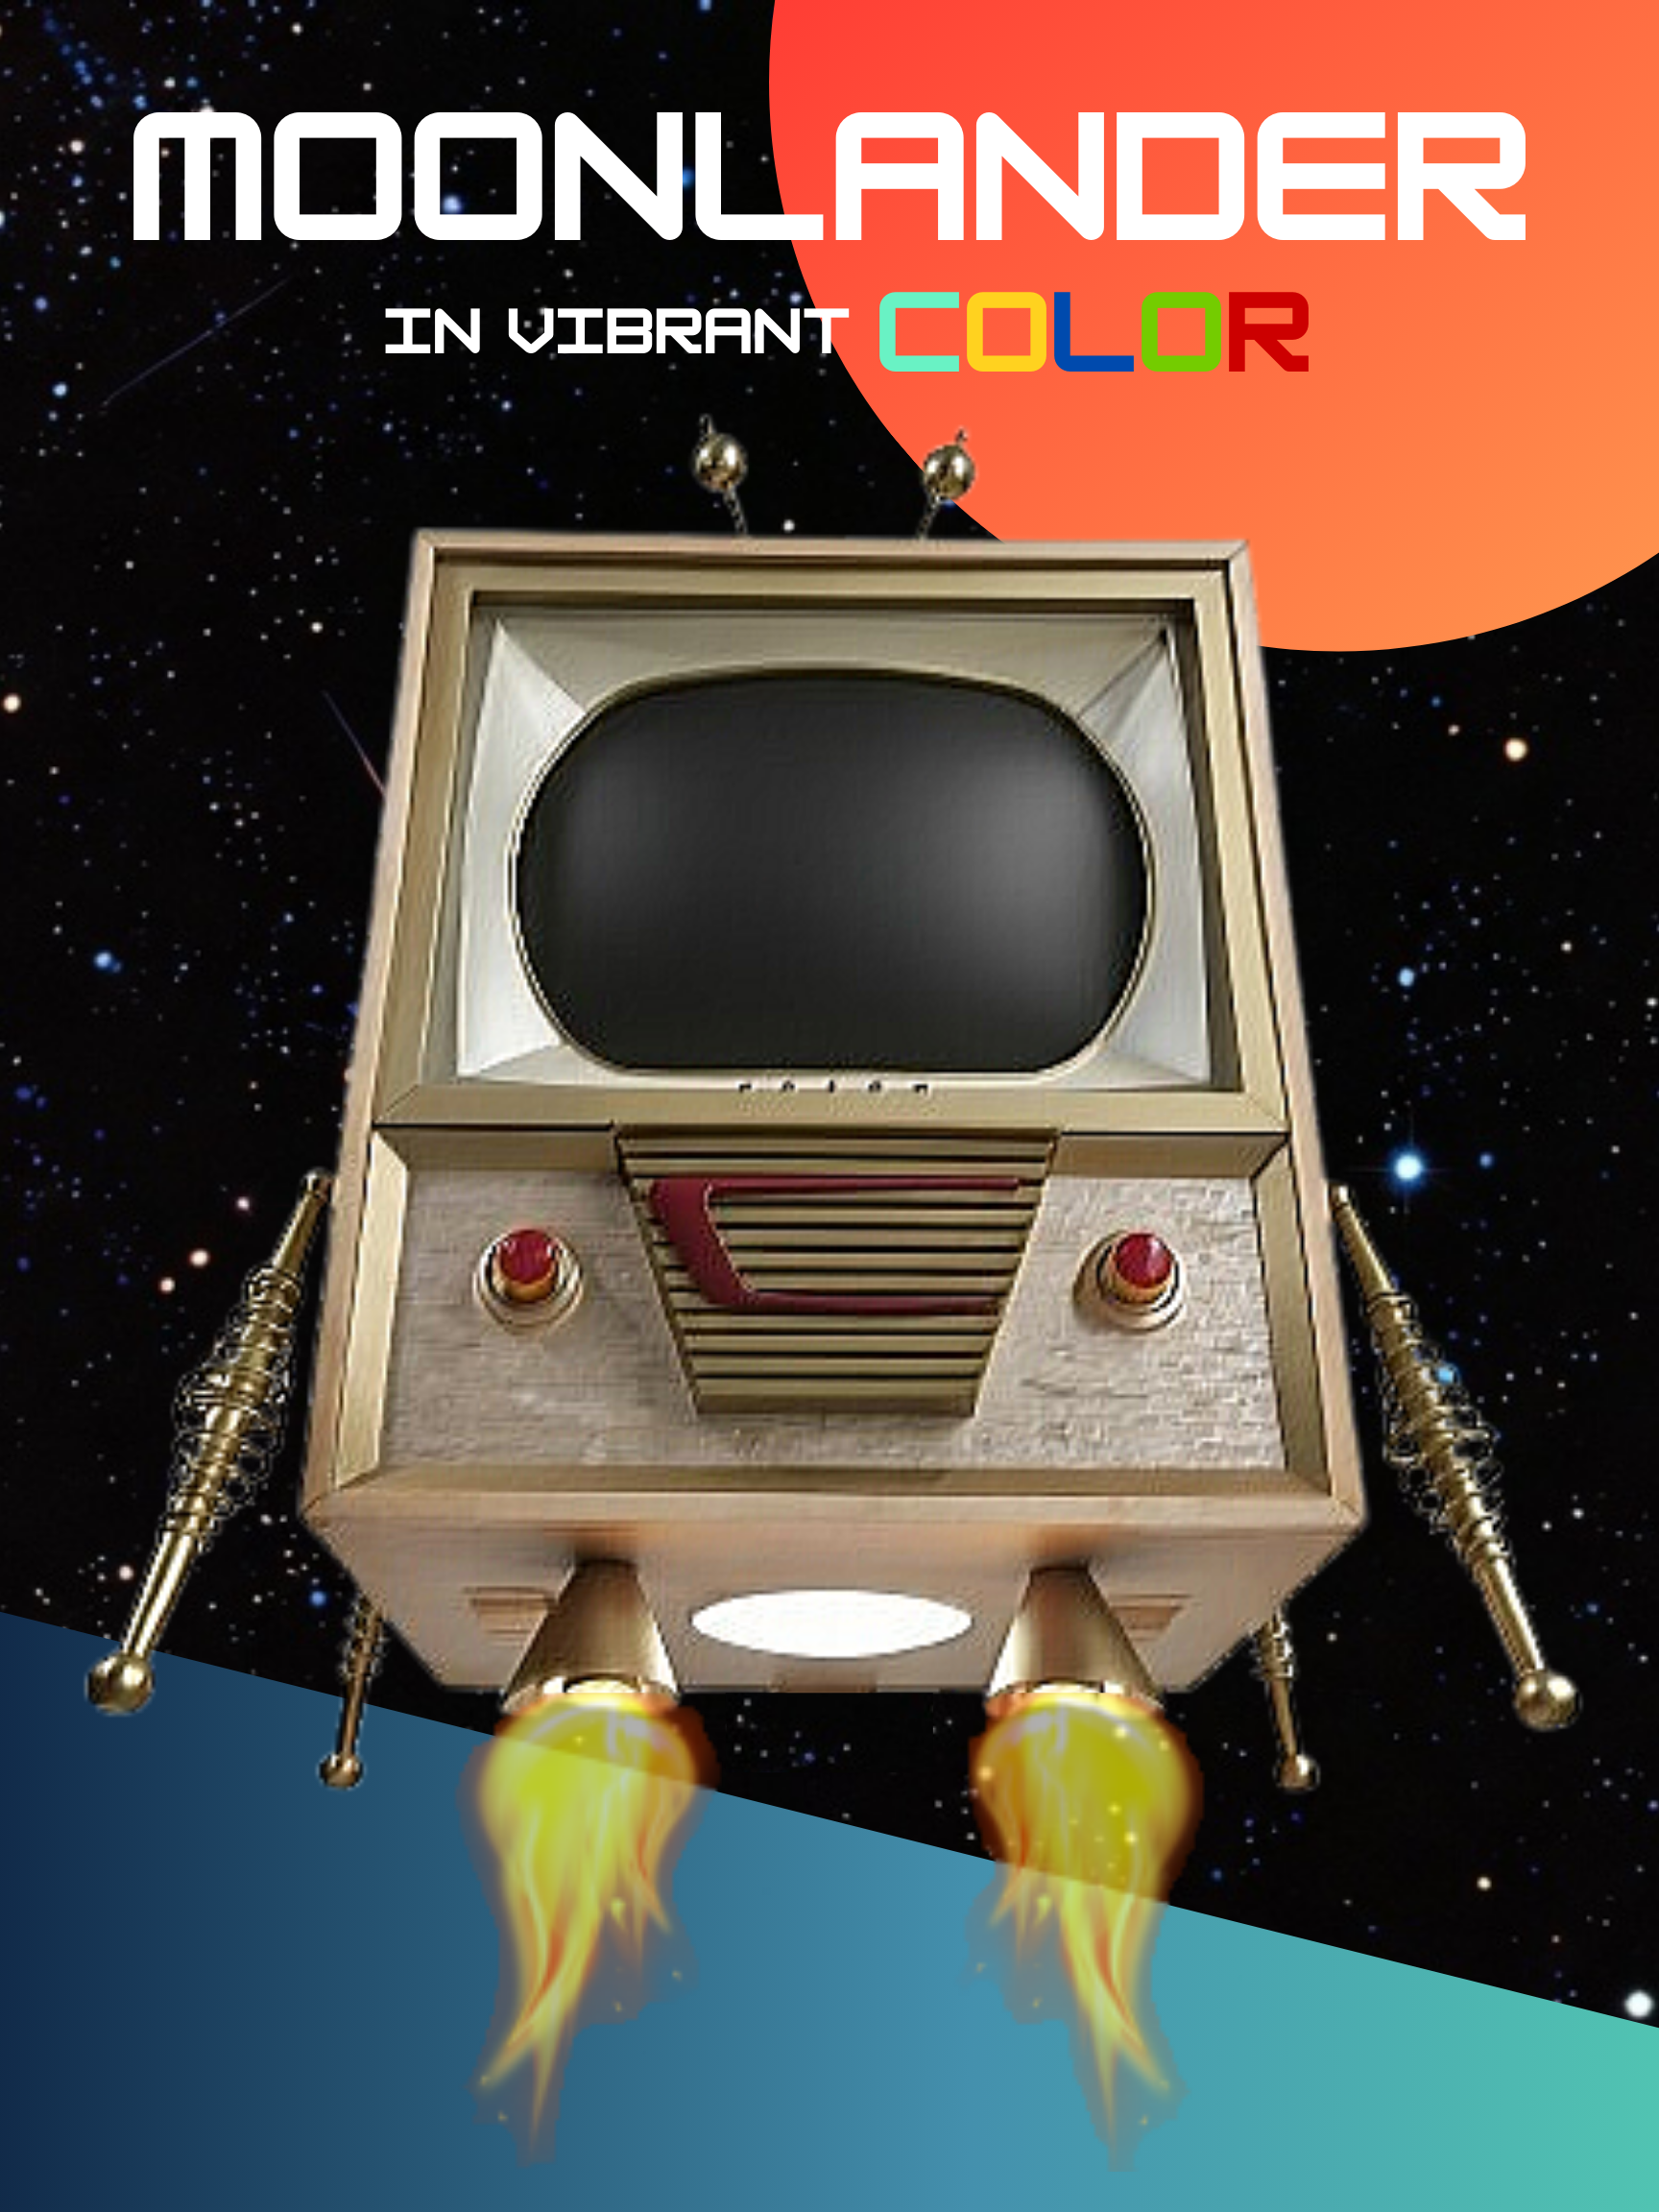
This build happened because I got sidetracked by a lone extra vintage RCA screen mask that was hanging on the shop wall. It seemed to fit a 25” color TV pic tube from 2001 rather nicely. I also had a couple small pieces of black walnut plywood that had really pretty grain… but not enough to make full sides. So, I spliced in some maple for the bottom sections and used a thin brass transition strip between them. I thought that it looked cool as kind of sci-fi moon lander… so the legs were built to capture that look. The trapezoidal panel in the lower section flips open and there is space inside for a small dvd player. The cover trim on that door is off an old 70’s Honda motorcycle gas tank. I also added lights behind the faux knobs to make them glow and an led light disc on the bottom for a little glow. And, of course, a custom built antenna. More pics in the gallery!


More pics in the Gallery! From decades of collecting vintage sets - I have a lot of extras and spare parts. I have many original Predictas that have been left original. Sometimes though… I find ones that are so rough that they need a complete make over. The “photo finish” fake wood grain printed on Masonite board is not like wood or wood veneer that you can sand and refinish. So in cases where that finish or other parts of the case or screen housing are severely damaged - I opt for custom colors.
I also like to add small touches like brass inlay in the wood joints and brass U channel capping on the grill slats.
Some of these sets also have bad CRT (picture tubes)… so this way I still get to enjoy their sculptural presence even if they do not function.


I have been going through the spare parts pile lately and building some robots. This fella is around 7ft tall and lights up. Made from a variety of vintage and new stuff. His name is Bendix because the glass panel on his chest is a salvaged door from an old 1950’s Bendix Duomatic washer/dryer. More pics in the gallery.


The Comet
Read MoreI just rescued 2 of these awesome Norge Globe signs. Both need some work but there are not many left out there… so you have to take what you can get!
Norge started opening "Norge Village" laundry centers in 1960. These globes were designed in 1962 by Rohm & Haas and now are commonly referred to as Norge Balls in the retro world. Definitely an icon of Mid Century signage!
Watch the vid as the Norge Ball floats gracefully through the air - with the help of some retro music!


First -a quick request for some help: I am searching for one of the twisted DNA looking “tree form” play pieces - the small curved wall pieces and the smaller slides with the 3 holes shown in the pics below - if you have a lead… please let me know!
I grew up in a classic post war suburbia neighborhood in Maryland. One of my earliest fascinations (and perhaps a watershed moment which could be responsible for my retro design obsession) was the first time I saw the “Saddle Slide”.
I was four in 1975. I still remember going to the playground at my local elementary school for the first time and standing in complete awe of this creation. It made me feel instantly happy. It was pleasingly curved and seemed to want you to run your hands along it as you crawled all over it. It even provided some cave-like shelter underneath if you needed a break from the sun or wind. On a hot summer’s day, the smooth concrete construction was cool and refreshing against your skin. Sometimes I pretended it was a strange magical animal and sometimes it was spaceship from another world.
At that time, I of course had no idea about the details of how it came to be. I had no idea that it was a vision brought to life from the mind of artist and sculptor Jim Miller-Melberg. I just knew it was somehow something very, very special. Sometimes, I would even just sit on the steel monkey bars nearby and look at it because when I was playing on it I simply could not see it in it’s entirety.
There was also a shopping center nearby that had a play courtyard. The courtyard had green astro turf and in addition to a “Saddle Slide” like the one I enjoyed at the school- it was outfitted with several other Miller-Melberg creations. I spent some time crawling on these pieces as well on occasions when my family shopped there.
About 20 years ago, I knew the school was getting remodeled so I called the county and tried to purchase the Saddle Slide - but in the end, I was unable to get them to let me buy it and it was demolished. What a sad, sad day.
Recently though, I was able to find and rescue this one from a long unused park in Toledo, Ohio. THANK YOU, TOLEDO!
I will post some links below if you want to learn more about Jim Miller-Melberg and his creations. The first 2 pics in this entry shows the actual one I ended up getting. There are also some pics of his other creations.
Basically - Miller-Melberg was an inspired genius who - as an adult - was still able to tap into the imaginative heart and mind of a child. I got to play in a sculpture garden as a child and that did some wonderful things for my mind.
From a time long before the internet and advanced advertising technology - when roadside shock value was the name of the game, businesses along the American roadside used all kinds of wacky signs and statues to lure motorists in. This big fella is an enduring testament to a bygone era of the kitschy American roadside landscape.
There is a lot of documented history on these giants already - so I won’t go into all of that here. But, if you are interested in the back story of the Phillips 66 Cowboy (a.k.a. Muffler Man) check out: https://www.roadsideamerica.com/story/47459 and https://usagiants.com/about/ Both are excellent resources on the history and variations of these giants as well as information on the International Fiberglass Company that ended up producing them. The Roadside America link above actually has an interview with the owner of International Fiberglass and he goes through the entire history.
Ron and Maxine (the original owners) operated a Phillips 66 station back in the early 60’s in Havre de Grace, Maryland. When the sales reps came around showing off their new “sales booster” (a 20 foot tall fiberglass cowboy who looks like one of the lantern jawed characters from a 50’s Superman comic book), Ron opted to purchase one and have it permanently in place at his station.
He became an instant attraction. He originally was mounted on the roof of the station but was later moved to the ground and stood in front of it. Ron fashioned a special cart for the cowboy and he was even wheeled through downtown Havre de Grace for a parade. He is so enormous that he had to be leaned back at times to clear the power lines that crossed the road.
In the early 90’s Ron painted him in Desert Storm camouflage to show support for the troops.
By the early 2000s Ron had sold the station and retired but he knew he could not just leave the big fella out there alone, so he put him on a trailer and stored him at his home nearby. I was able to get in touch with Ron a while back and after more than a year of talking and going back and forth, I was fortunate enough to have the opportunity to buy the cowboy. In my opinion, he looks a lot like my good friend and old band mate Jeff Ball… So I am going to name him Jeff. (There is a pic below of Jeff mugging it up next to his fiberglass likeness).
No offense to the troops, but I will be repainting big Jeff back to his original colors (or at least very close to original). I feel that it is the right thing to do. He will become part of a service station installation at Ghost Town. He still has his original hat which is very uncommon as all too often the hats blew off and were lost or severely damaged.
The pics and video below are a sampling of some that I just took when we were moving him and a few vintage shots that Ron and Maxine still had… along with a shot of the two of them standing with the big guy right before we loaded him on the truck.


